In machine-vision gaging, a camera takes a picture of a part and the picture is then processed to extract the desired measurements. Source: ipd, a division of Coreco Imaging
Machine-vision systems offer precision, accuracy and repeatability in many gaging applications. A typical machine-vision system for gaging includes mechanical positioning and lighting so that a camera can take a picture of the part. The picture is then processed to extract the desired measurements.
A machine-vision system can take thousands of measurements per second. It can measure attributes such as circularity or surface markings that are hard or impossible for contact gaging or optical systems to handle. Because machine vision is noncontact, the part is not damaged. Machine-vision gaging is normally blind to depth, except when combined with a structured light, or when two or more cameras are used to provide stereovision.
In the past, machine-vision gaging systems were expensive and difficult to set up. New pre-integrated machine-vision systems are more cost-effective and easier to use, making machine-vision gaging a viable choice for any manufacturer. Some systems have easy and intuitive interfaces and incorporate intelligence about measurements in the software, creating a gaging solution in minutes.
In most cases, machine-vision gaging can replace contact gaging. It will be faster and more precise, and will not damage parts. Some gaging applications are still better served using contact gaging because the contact method is inexpensive or because the part requires depth measurements that machine-vision gaging cannot provide. Some gaging applications require the accuracy and repeatability that only an optical gaging system provides, but the end user will pay more for acquisition and maintenance of an optical gaging system.

Today’s machine-vision systems simplifies setup with an easy and intuitive interface and by incorporating intelligence about measurements in the software, creating a gaging solution in minutes. Source: ipd, a division of Coreco Imaging
Performance characteristics
All gaging solutions need to have three important characteristics: repeatability, accuracy and precision.
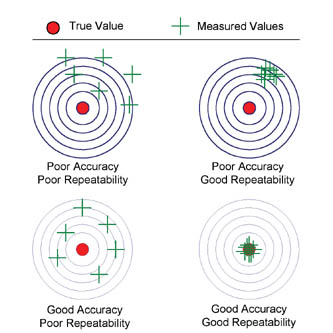
Repeatability refers to how close together repeated measurements are, or the variance of the measurements. Accuracy is how close the measurements are to the true value. Think of accuracy as the mean difference between the repeated measurements and the true value. Precision is the number of digits to which the measurement gage can be read.
All three of these characteristics are needed for the gaging system to achieve good performance. Some machine-vision systems are capable of high precision-up to six or seven digits. However, if the system cannot achieve a stated level of accuracy and repeatability, a high level of precision is meaningless. With on-line contact gaging methods, the opposite can be true: precision is often the limiting factor in measurement.

No matter what method—contact, optical or machine vision—is used, there are three important characteristics of any gaging solution: repeatability, accuracy and precision. Source: ipd, a division of Coreco Imaging
Influencing factors
In any machine-vision measuring system, several factors influence accuracy, repeatability and precision.
• Lighting: Select lighting (illumination) so the system can see the part "edges" that need to be measured. Good lighting will amplify the edges of interest and reduce irrelevant edges. Bad lighting can make any measurement impossible.
• Positioning: The part being measured must be placed in the camera's field of view. The more precisely the object can be positioned in the field of view, the more efficiently and effectively the machine-vision system will work.
• Optics (lens): A machine-vision measuring system is only as good as the image it is processing. Distortions in the lens can lead to measurement errors. Selecting the right lens is also important in maximizing the visibility of features of interest to give more accurate measurements.
• Camera: The camera must be specifically designed for machine-vision measurements. This includes having square (1:1 aspect ratio) pixels, sequential readout of the pixels and low jitter when the pixel intensity values are digitized. In addition, the machine-vision gaging system must incorporate the ability to trigger the camera to take a picture when the part or area being inspected is positioned directly in front of it. The trigger and camera are often coordinated with the lighting so that the light is turned on or strobed when the part is in place. And the camera must have a fast shutter speed so that it can prevent blurring because of part movement (on a conveyer belt, for example). The shutter must be synchronous (all at once) or timed to the movement of the part; otherwise, the shape and intensity of the part being measured can appear to be distorted.
• Algorithms: An algorithm is a precisely specified method for performing a specific task. In machine-vision gaging, an important algorithm is measuring distance to a fraction of a pixel (picture element) between edges or surface markings that appear in the image. Other important algorithms in gaging include search (the ability to locate a part in the field of view) and calibration (the ability to translate pixels into real measurements and to compensate for image distortion introduced by the lens).
Proper consideration and implementation of all of these factors-lighting, positioning, optics, camera and algorithms-are important to obtaining quality measurements.
One important item to note: some suppliers of machine-vision gaging systems provide theoretical specifications as opposed to measured performance. As a result, specifications like "measurement to 1⁄40th of a pixel" might be cited, but it will be impossible to achieve this accuracy or repeatability in practice. These figures look good on a specification sheet, but will not provide the information required to realistically evaluate the system's performance. Instead of theoretical specifications, look for systems that provide measured performance values based on real tests.

From the roundness and center of each hole, machine-vision gaging can find the position of each hole with respect to some reference point on the part. Source: ipd, a division of Coreco Imaging
How machine-vision gaging works
• Select a lens and working distance, which is the distance from the lens to the part being measured, that provide a good field-of-view. A good field-of-view includes the areas of the part to be measured, plus a little more to allow for part movement and alignment, but no more;
• Properly position the part being measured in the camera's field
of view;
• Provide light that clearly shows the edges and markings to be measured;
• Make sure that the accuracy and repeatability offered by the vision system are appropriate to the measurement task.
Machine-vision gaging systems take measurements between edges in the image. An "edge" is an abrupt change in intensity, which can also be thought of as brightness that often, but not always, corresponds to a physical edge on a part. In addition to physical edges, printing, marks, scratches and shadows can be seen as edges. Some of these non-physical edges are fine to use for measurement but others, such as shadows, can be too variable for reliable measurement. Smooth or low-contrast edges, such as fuzzy blobs, are difficult or impossible to measure accurately.
After the edges, holes and other features to use for measurement have been specified, the machine-vision system measures their positions to a fraction of a pixel. These measurement results are used to pass or fail the part and can be used for process control and monitoring.
In the past, it was not so easy to set up a machine-vision gaging system. Besides the lighting, optics and mechanical issues, users needed to know how to program the machine-vision system, and that often took days or weeks of training and experience. The new machine-vision gaging systems are easy to set up and require no programming and only about an hour of training. Most machine-vision gaging applications are up and running within hours, or even minutes, depending on the complexity of the application.

The lighting, lens and positioning have to provide a good, high-contrast image so that machine-vision gaging can locate and measure the edges of the objects—in this case, the metal rod diameters. Source: ipd, a division of Coreco Imaging
Application examples
An example of a gaging application that can be solved by machine vision is measuring the roundness and center of holes, and the distance between the holes; for example, on a metal part with holes drilled or stamped in it. From the roundness and center of each hole, machine-vision gaging can find the position of each hole with respect to some reference point on the part. Finding roundness with a contact gage is a slow and difficult process, particularly if there are many holes to measure, and an optical system will not perform this task as well as machine-vision gaging.
With the proper lighting, lens and positioning, machine-vision systems can perform these measures in a fraction of a second. These results can then be analyzed to pass or reject the part and to gather statistics that might indicate, for example, excessive cutting tool wear. This noncontact measurement cannot damage the part, and a changeover to different part types can be performed quickly.
Another example of machine-vision gaging is measuring the size and position of surface markings on a part; for example, the position of stripes in a chromatograph or the location of embedded material, such as metal rods in a plastic matrix. In these cases, there are no 3-D structures for a contact gaging system to ‘touch' and for an optical system to measure, so a machine-vision system is the only choice. Again, the lighting, lens and positioning have to provide a good, high-contrast image so that machine-vision gaging can locate and measure the edges of the objects.
Machine vision is no longer a solution that only those companies with unlimited budgets and a deep engineering pool can implement. With the range of cost-effective, high-performance and easy-to-use systems available today, any manufacturer can solve measurement applications using machine-vision gaging. Put your calipers aside and give it a try. Q
TECH tIPS
• Machine-vision systems offer precision, accuracy and repeatability in many applications.
• A typical machine-vision system for gaging includes mechanical positioning and lighting so that a camera can take a picture of a part. The picture is then processed to extract the desired measurements.
• Machine-vision systems can take thousands of measurements per second and can measure attributes such as circularity or surface markings.
