
The pairing of two seemingly disparate processes-photography and measurement-could only result in something interesting, something completely out of the ordinary. Since the introduction of the box camera in 1888, the endless possibilities of a device so portable, so adaptable to any setting has enabled the world to embrace the art of capturing images like no other pastime.
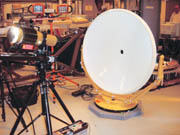
Fast forward to 2005. The digital photography revolution is progressing in leaps and bounds. Stir industrial metrology into the mix, and a portable coordinate measurement technology has emerged-photogrammetry. No cords. No cables. Just the operator, a camera and the object to be measured.
Photogrammetry is a 3-D coordinate measuring technique that uses photographs as the fundamental medium for metrology. The technology began to thrive in the early 1970s when civil engineers and surveyors began using photogrammetry for measuring and creating large 3-D topological mapping systems. With the success of photogrammetric technology in this discipline, soon industrial engineers were looking to reap those benefits in their respective industries.
Breakthroughs in both math and science evolved this sector of metrology into what is known as close-range photogrammetry. The combination of an ultra-mobile photogrammetric camera and the high-precision measurement capabilities of a coordinate measuring machine (CMM) sets this technology apart in a field all its own. Photogrammetry is used extensively for industrial applications such as in-place measurement, tooling inspection and adjustment, test-retest measurement, deformation studies, part inspection and tamoana (disassembly and reassembly) studies. Engineers and quality professionals working in aerospace, shipbuilding, automotive, antenna and satellites, space hardware and power generation have found photogrammetry to be the one portable measurement technology that is not hindered by harsh conditions, populated production lines or formidable plant settings.

Photogrammetry principles
Triangulation is the fundamental principle used by photogrammetry. By taking photographs from at least two different locations, lines of sight can be developed from each camera to points on the object. These lines of sight, sometimes called rays because of their optical nature, are mathematically intersected to produce 3-D coordinates of the points of interest.

Measuring industrial objects with photogrammetry usually consists of the following steps:
• Planning the measurement
• Targeting the object
• Taking pictures
• Measuring pictures
• Processing pictures to obtain 3-D coordinate data
• Analyzing the results
This list is a merely a general guide as every measurement project is unique. Sometimes the content and even the order of these steps may be modified.
There are many ways to capture points of interest on an object. Targeting is just one method used in close-range photogrammetry. The photogrammetry system measures special targets made of a thin 0.1 millimeter-thick, flat, grayish colored retro-reflective material, which efficiently returns light to the light source.

The photogrammetric camera does not measure the object directly, but measures the center of the retro-reflective target. By placing the target on or in a known relationship to the point of interest, the point can be measured. In some circumstances, it may be difficult to target the point to be measured directly. Fortunately, many different types of retro-reflective targets have been developed to solve this issue.
Once an object is targeted, the camera's flash illuminates the targets and makes exposure of the targets independent of the ambient light level. This means the object can be photographed in bright light or total darkness, and the target exposure will be the same. Therefore, the target and object exposure are largely independent as target exposure is provided by the strobe, and object exposure is provided by the ambient light. The camera automatically sets the shutter speed and flash power setting based on lighting conditions in the environment.

While targeting has been the mainstay in photogrammetry, new developments are giving the quality control professional new alternatives to capture points of interest. For example, one company has developed a stroboscopic light projector that casts thousands of dots on a surface and measures them in less than one minute. Designed with large objects in mind, this new system generates fast, accurate, dense, noncontact measurements on large surfaces such as molds, master models, panels and antennas.
Picture perfect accuracy
How many photographs are needed for an accurate measurement? As photogrammetry measures by triangulation, in theory only two photographs are required for a measurement. However, a minimum of four to six photographs is recommended because this range allows the operator to self-calibrate the camera.

Photogrammetry is precise and provides accuracies comparable to those achieved by other large volume, high-accuracy coordinate measurement systems. Typical accuracies are 25 to 50 microns, or 0.001 to 0.002 inch, on a 3-meter object.
Photogrammetric accuracy depends on several interdependent factors:
• Camera resolution
• Size of the measured object
• Number of photographs taken
• Geometric layout of the camera stations, or camera locations, relative to the object and to each other.
Photogrammetry and metrology
In the field of metrology, photogrammetry has the ability to measure and inspect large objects in busy industrial settings where environmental factors like vibration, movement and extreme temperatures often are found. A photogrammetric camera can gather 3-D data with laboratory quality and accuracy without laboratory conditions as required by other metrology instruments. Precise measurements can be captured while the camera operator is standing on an unstable floor, or from a lift or scaffolding on the plant floor. Photogrammetry also is immune to harsh conditions in outdoor environments such as shipyards and remote space antenna fields.
Inspection of large assemblies, such as aircraft, automobiles and space hardware, in a production environment can be a difficult task. A shop floor or assembly line presents many obstacles for quality control personnel. Workers, tools, equipment, cabling channels and other obstructions can impede the line of sight. Because of the portability of a camera, operators can shoot field measurements with minimal downtime to others working concurrently on an assembly of an aircraft, automobile or other large assembled objects.

Photogrammetry transforms the plant floor into a place where metrology adapts to the production line in practical way. This interaction revolves around working people and productivity. With the least amount of impact to others working in the same environment, the QC department can use a photogrammetric camera to gather critical coordinate data, perform analysis, breakdown the assessment and make adjustments all within the confines of a work day. Q
Gary Johanning is vice president of Geodetic Systems Inc. (Melborne, FL). For more information, call (321) 724-6831, e-mail [email protected] or visit www.geodetic.com.
Tech tips
• Photogrammetry is a 3-D coordinate measuring technique that uses photographs as the fundamental medium for metrology.
• Photogrammetry is one example of portable measurement technology that is not hindered by harsh conditions, populated production lines or formidable plant settings.
• Triangulation is the fundamental principle used by photogrammetry.
• The photogrammetric camera does not measure the object directly, but measures the center of the retro-reflective target. By placing the target on or in a known relationship to the point of interest, the point can be measured.
