When the X-ray was discovered in the late 1800s, no one would have guessed that it, coupled with later developments in computer tomography (CT), would revolutionize medical science. Now, more than 100 years later, a new generation of CT derived from the scientific principles of X-ray is promising to transform nondestructive material examination in the industrial sector.
The promising new technology also will expand industrial tomography applications from material inspection to accurate dimensional metrology, according to Dr. Ralf Christoph, president of Werth Messtechnik GmbH (Giessen, Germany, and Old Saybrook, CT). "Over the past couple of years, completely new possibilities have been created by the world's first integration of CT with a multisensor coordinate measuring machine," he says. "This technology provides for the quick, complete and nondestructive measurement of many features with CT combined with the highly exact measurements of functional dimensions with tactile or optical sensors."

CT evolves
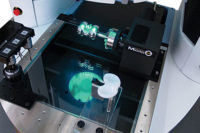
Christoph is referring to the Werth TomoScope, a multisensor coordinate measuring machine (CMM) that produces 3-D measurements according to the CT principle working in combination with additional sensors. The unique technology has been released in Germany and will be available in the United States this fall.
Generally speaking, industrial CT involves the capture, processing and reconstruction of a 3-D workpiece from multiple views to create an image of internal and external geometry. Applications include visualization of the quality of internal elements of electronic devices and the quantified 3-D measurement of porosity in advanced castings.
Flexibility combined with high accuracy has led to a wide range of CMMs for dimensional measurement in production control, as well as for first-piece, tool and developmental inspection in the laboratory. The advantage of CMMs with multisensor systems is that the operator can choose the sensor best suited to a given measuring task. The operator is not limited, given a choice of sensor types, to a specific measuring strategy, and therefore is able to generate an optimized testing plan in one measuring run. This guarantees economic advantages, flexibility and higher reliability. Even the measurement of a complete part geometry with a multisensor CMM needs a relatively long programming and measuring time.
"This technology is unique in that we've taken tomography technology and extended it to dimensional metrology by combining it with multisensor CMM technology. The CT benefit to be able to measure many points in a short time was brought together with the high accuracy of a CMM. Rather than measure the size of parts, we now can measure the sizes, angles and diameters of the structures inside of a part-and we can measure calibration points with accurate CMM sensors in the same measurement run to ensure precision and traceability of the results," Christoph says.
Until now, there has been no ability to perform complete and accurate recognition of all regular and free-form geometries of a workpiece, or internal geometries and inaccessible characteristics such as hidden edges and undercuts without destroying the part, he adds.
The system involves a workpiece that is placed on a revolving stage and X-rayed. A detector converts the X-ray image into a digital 2-D image for further processing. "The object then is rotated 360 degrees and X-ray images are taken in several positions of rotation," Christoph explains. "Subsequently, a 3-D reconstruction of the measuring points depicts the entire workpiece geometry. These points are employed for subsequent examination of the workpiece geometry."
Applications, which can be extended through the integration of further sensors, involves an image processing (IP) sensor that enables the operator to make fully automatic, highly accurate measurements of complicated, extremely low-contrast workpieces in the back-lighting and surface-illumination mode. An additional laser sensor allows for the measurement of surface profiles. A tactile sensor system is what enables the highly accurate measurements of optically inaccessible workpiece characteristics. Mainly the tactile sensor but also the optical sensors can be used to increase the accuracy of the tomographic measurements by mathematical correction.
The main structure of the tomoscope consists of a stabile granite base with an integrated rotary axis, and an optional second Z-axis provides for collision-free operation in multisensor mode. "In addition, the technology incorporates motorized, precision mechanical linear guideways in all axes suitable for the workshop environment," Christoph says. "In both the design and construction, the measuring machine meets the safety requirements defined for X-ray utilization, and operators are fully protected from the source radiation. Additional safety features have been provided over and above all legal requirements."

Measuring software and more
The new tomoscope includes a compact X-ray sensor head with a resolution of 1024 X 1024 pixels, as well as an IP system for generating and processing X-ray images. The grid tomography extends the area of measurement, and the system's software optimizes the speed of the 3-D reconstruction of workpiece geometry. The system also is capable of 2-D X-ray image measurements.
The system uses WinWerth measurement software-graphically interactive, user-friendly software that operates under MS Windows. "The interactive graphic instructions are suited for use in a workshop environment and the software consolidates all data-handling functions that are necessary for the measuring process from tomography to the final comparison with CAD data," he says.
The high-powered image processing system allows for reliable and automatic measurement of objects, even when there is low contrast and object characteristics fluctuate. Measurements made with a combination of X-ray, optical image processing, 3-D tactile-dynamic scanning and touch trigger-and laser sensors extend the flexibility and application range of this new CMM technology. This further qualifies the multisensor concept as a premier measuring technology for the workshop and the laboratory.
TECHNOLOGY CONTACT
For more information on
Werth Messtechnik's technology, contact:
Werth Inc.
8 Custom Drive
Old Saybrook, CT 06475-4008
(860) 399-2445
E-mail: [email protected]
URL: www.werthinc.com
or www.werthmesstechnik.com
