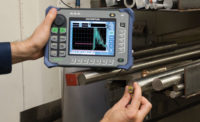
Ensuring the integrity of joined materials is always paramount in delivering quality and safety in both structural members and manufactured components. Ultrasonic inspection has long been used as a primary nondestructive test (NDT) method for a variety of weld and bonding processes. Selection of a range of frequencies and modes of sound propagation allows testing a variety of materials, including metals, plastics and composites over a broad range of thickness and joint configurations.
Conventional ultrasonic flaw detection using small, handheld instruments with single element transducers is well-established as a quality control technique in many manufacturing and service industries. In recent years, there has been growing interest in phased array systems that use sophisticated technology based on multi-element probe assemblies to generate steered beams and create cross-sectional pictures similar to those in medical ultrasound imaging. These instruments also are commonly used for industrial inspections.
How it Works
The technology of ultrasonic flaw detection is based on a simple principle of wave physics. A high frequency sound wave that has been launched in a solid medium, such as steel, will travel in a straight line until it encounters a material boundary-a far wall, another material interface or a hidden crack. At that point, the sound wave will be reflected and/or diffracted in a predictable way. Ultrasonic flaw detectors generate short bursts of sound energy through small, handheld probes that are coupled to the surface of the test piece. The instrument then displays the pattern of sound reflections, which will change as material conditions change.
Sound waves in solids vibrate in various modes of propagation that are defined by the type of motion involved. Longitudinal waves and shear waves are the most common modes employed in ultrasonic flaw detection. Surface waves and plate waves also are used on occasion but are far less common.
Longitudinal waves are characterized by particle motion parallel to the direction of propagation and are typically used for locating voids, porosity and cracks or delimitations parallel to the outside surface of a part, as well as for measuring thickness.
A shear or transverse wave is characterized by particle motion perpendicular to the direction of wave propagation. Shear waves travel at a slower acoustic velocity and thus present a shorter wavelength, increasing resolution as compared to equivalent compressional wave frequencies. Shear waves are generally produced using angular offset via a polystyrene wedge.
Weld Inspection
Ultrasonic testing of structural welds is used to check penetration depth and detect lack of fusion, toe cracks, root cracks, as well as porosity or slag inclusions. Weld configurations are varied, including butt welds, lap welds, T-welds in plate and seam welds in piping.
Cracks or other discontinuities perpendicular to the surface of a test piece, or tilted with respect to that surface, are usually invisible with straight beam test techniques because of their orientation. An angle beam assembly directs sound energy into the test piece at a selected angle. A perpendicular crack will reflect angled sound energy along a path that is commonly referred to as a corner trap.
In particular, inspection procedures generally specify use of primary inspection angles of 45, 60 and 70 degrees with at least one angle matched to the bevel of the weld. For these inspections, the probe is moved forward to inspect in the first leg for ID connected cracking and lack of penetrations. The probe is then moved backward to create a skip off the back wall for inspection in the second leg along the bevel and top of the weld. To achieve full volumetric inspection of the weld, the operator must continue to move the probe along the entire weld length in a raster scan pattern.
Skewing the probe also is required to help identify and distinguish flaw type. The echo-dynamic from a planar flaw such as lack of sidewall fusion or cracking is very directional and will fall off sharply when the transducer is skewed. Multiple small reflectors such as porosity or inclusions will have a ragged multiple peak amplitude response which is more constant as the probe is moved.
There are numerous methods for flaw sizing, but all require comparing echo amplitudes to a calibration reflector. Flaw boundaries often can be recorded by scanning along the length of the flaw and marking the amplitude envelope as the sound beam is moved. Flaw depth is calculated using trigonometry to convert angular sound path to distance from the front of the probe and depth. This calculation is displayed in real-time in today’s digital flaw detectors.
Generally, higher frequency probes are required as the parts get thinner. As parts get thicker, not only are lower frequency probes required, but it is often necessary to inspect the weldment in zones, using a variety of probe angles and frequencies. While shear wave inspection works well in ferritic steels, austenitic and coarse grain materials are very attenuating.
For these anisotropic materials, the velocity varies with angle making it difficult to perform through wall sizing. In these cases refracted longitudinal wave transducers are used, particularly in cases where through wall sizing is required. To maintain resolution in this longer wavelength approach, twin crystal probes with a compound angle wedge are used to focus the beam at appropriate inspection depths.
Phased Array
Advanced techniques can be used to visualize defects in welds. One such approach simply arranges angle beam probes on either side of the weld in an encoded scanning fixture. Amplitude and time responses are recorded along with transducer position to produce a map from each probe. The need to manage multiple probes, however, makes the setup complex.
Phased array instruments work with multi-element probes that are individually pulsed and time-delayed. Beam steering allows one transducer to generate an image from a sequence of angles (sector scan) or to produce an image of a fixed angle that travels over the length of a probe (linear scan). For manual weld inspection, a 40 to 70 degree sector scan is commonly used.
Simultaneous live inspection across a range of angles inclusive of the primary angles specified for conventional ultrasonic testing enhances probability of detection. The sector scan aids in differentiation of flaws from weld geometry and eases identification of flaw types. The height of ID connected cracks can be estimated from the image data directly. A weld overlay is commonly generated as part of the image to help place flaws within the weld volume.
When using a linear array, a fixed angle can be swept forward and backward from the weld electronically. Moving the probe along the length of the weld increases inspection speed. Using phased array probes as part of an encoded scanning fixture significantly reduces the number of probes required, and hence, reduces complexity of automated systems.
Bond Inspections
A variety of manufactured components are joined together via welding or adhesion procedures. When these interfaces are parallel, a longitudinal wave probe can be used. Brazing is a common process for joining sections of small diameter metal tubing and certain other small metal parts such as electrical contacts. It bonds two pieces of metal by means of metallic filler through a capillary process. If the braze metal does not flow properly or does not fuse, the integrity of the joint will be affected. The transducer should be selected with respect to the geometry of the specific joint being tested.
Frequently small diameter, high-frequency delay line transducers are recommended. As discussed previously, visualization of bond integrity of similar materials can be accomplished from an encoded C-scan image generated mechanically along two axes or with phased array using a linear array probe encoded in one direction. This C-scan image presents a planar map of defects at the bonded region.
While bonding of similar materials is easily identified through signal reflection at the boundary, when the two bonded materials differ greatly in acoustic impedance, such as a plastic to metal bond, the change in the amplitude of reflected signals between good and bad bonds is less dramatic. In these cases, the most readily visible difference between bonds and disbond is a reversal in the phase or polarity of the echo from the boundary. This phase shift will occur whenever a material of low acoustic impedance such as plastic, composite, fiberglass, rubber or epoxy is bonded to high acoustic impedance materials such as metal, glass or ceramic.
In cases where the test must be performed from the high impedance side of the joint, a ring down technique can be used. This involves observing a series of multiple reflections from the boundary and looking for a difference in the rate at which the amplitude of successive echoes, or the ring down envelope, changes between bond and disbond conditions. As the sound wave reverberates in the metal or other high impedance material, the amplitude change is multiplied at each bounce. For example, a hard-to-see 5% amplitude drop between disbond and bond conditions at the first echo becomes a 25% drop at the fifth echo and a 50% drop at the tenth echo.
While the change in a single echo may be small, the collective change across a series of multiple echoes will be much larger and easier to identify. In a typical joint, bond and disbond conditions will each produce their own distinctive ring down pattern.
Ultrasonic shear and longitudinal wave inspection techniques are well proven NDT methods applicable to a variety of joined material configurations. Availability of industrial phased array instruments often can reduce complexity of volumetric inspection and aid in defect visualization leading to improved probability of detection.
Tech Tips


