Figure 1. Source: Carestream Health

Figure 2. Source: Carestream Health
Because of the nature and location of in-service piping, such shots are commonly done with portable gamma sources, favored in field-radiography applications because of their mobility, portability and self-contained nature. Furthermore, the high energy of gamma sources often is required to penetrate the path length along the tangent to the inner pipe wall, especially with increasing pipe diameters. Although not as common, X-ray sources also are used, particularly in applications involving smaller diameters and thinner walls.
To facilitate reliable measurements, the radiograph must accurately record the locations of the outside and inside walls of the pipe. While image quality requirements are not particularly demanding for wall thickness measurements, the exposure must be controlled such that there is sufficient penetration to image the inside wall, but not so much that the background of the image is saturated, compromising the location of the outside wall by “undercut.”
Normally, this is not an issue when using gamma sources because the absorption of storage phosphor imaging plates is relatively inefficient at such high energies, and it is difficult to saturate the background. On the other hand, the imaging plates are very efficient at absorbing lower (X-ray) energy, and the background can easily be saturated.
A good rule of thumb for the background is not to exceed about 80% of the available dynamic range (maximum intensity) of the image. Let’s consider the two most common imaging modes.

Figure 3. Carestream Health
For a 12-bit log image with a maximum pixel value of 4,095, the background should not be more than about 4,000. How and why 4,000 is 80% of 4095 is not obvious to those who do not “think” in logarithms.
There are two basic ways in which an inspector measures wall thicknesses on a pipe radiograph. In the most rudimentary method, the viewing software allows the inspector to calibrate a ruler to a known reference in the image, then use that ruler to make measurements based on visual observations and determinations of the inside and outside wall boundaries. This requires not only an accurate radiograph, but also an accurate display on the monitor. Any errors in the window (contrast) and level (brightness) adjustments could easily result in misperceptions of where the wall boundary actually is, and hence erroneous measurements.
Fortunately, most viewing software also features more sophisticated measurement options whereby the measurement tool is performing the analysis on the underlying data, and not dependent on the display or the inspector’s ability to locate the wall boundaries.
In either case, though, the radiograph must accurately capture the precise locations of the pipe’s inner and outer walls to facilitate accurate measurements.
Now, let’s follow a couple of examples showing a gamma shot, a poor X-ray shot and a simple technique to produce a nice X-ray shot suitable for measurements.
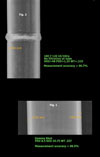
First, let’s look at a baseline image. Figure 1 shows a gamma shot with good overall exposure, good delineation of wall boundaries and a background intensity well below saturation. Properly calibrated for length, a wall thickness measurement tool yields a result with about 98.5% accuracy on this image.
Figure 2 is an X-ray shot, made with a typical combination of copper screens of 10-mil, front and back, inside the cassette, but no tube filtration. While the image appears suitable, note that the background is saturated, with a pixel value of 4,095. In this case, the saturated background compromises the outside wall boundary, resulting in a measurement accuracy of only 90.7%. While this may be considered accurate enough for some applications, it can certainly be improved.
If using X-ray as the source for profile shots, how does one limit the background intensity and make the image look more like a gamma shot? The answer is not really a secret, and in fact is a simple technique familiar to many radiographers: pre-filtration at the tube.
A few millimeters of copper at the tube will filter out the low energy portion of the X-ray spectrum, effectively “hardening” the beam. This leaves the higher energy portion of the beam to effectively penetrate the specimen, but eliminates the low energy portion that would easily be absorbed by the imaging plate, resulting in background saturation. The result is shown in Figure 3, in which 4 millimeters of copper at the tube reduced the background to well under saturation and yields a measurement accuracy of 99.1%. Note that the extra copper filtration even cleans up the inside wall boundary, so accuracy is improved all around.
Whether it is gamma or X-ray, profile shots can be optimized for accurate wall thickness measurements. All it takes is a little common sense and a few millimeters of copper.


