Today, 3-D data is required for many measurement, control and error proofing applications. But most people think that implementing 3-D vision is challenging, requiring a lot of experience, time and expense. What if all these tasks were already done for you, in a packaged 3-D sensor that is easier to implement than most 2-D vision sensors?
Many of today’s 3-D sensors are based on either laser triangulation or structured light projection. System integrators or end users have several options for implementing 3-D sensors. At the high end of complexity, one can acquire the individual components (imaging camera, laser or other light projector, optics and other modules) and integrate them into a sensor. The assembled sensor then requires software development and application of measurement calibration procedures. This can be a significant and expensive task, particularly for those with limited experience in implementing 3-D sensors. A second and simpler option is to acquire an assembled, calibrated 3-D sensor. Most of these products provide only data acquisition and still require measurement software development for a specific application, often operating on an external PC for extraction of particular measurements from 3-D profile data.
Today, a third even simpler option is available in a new category of all-in-one 3-D smart sensors, with all functionality and flexibility built in to the sensor itself. Simplicity of sensor implementation is provided with a built-in web server, with sensor setup done from any PC with any common web browser, without requiring installing any additional software. The setup device can use any operating system—PC, Mac, Linux, even mobile devices. Through the intuitive GUI, users can configure the sensor parameters, visualize profiles, measure dimensions and select outputs for communications. Many common languages can be selected at startup, simplifying implementation in many countries. On completion of sensor setup, the PC can be removed.
To meet individual application needs, sensors are available in a variety of sizes, with different measurement ranges and fields of view. Compact sensor footprint makes mounting easy even in congested areas. For high resolution applications, megapixel imager based sensors provide high speed data at resolutions down to the micron level. Industrial IP 67 packaging insures reliable operation in the factory environment.
Sensors are available with speeds from 200 Hz up to 5 kHz to match specific needs. Triggering can be based on time, encoder signals or external triggers.
Selections of laser powers are available, including Classes 2M, 3R and 3B. Higher laser powers are useful where sensors must operate reliably in high ambient light levels, such as in outdoor measurement applications in direct sunlight.
Setting the proper exposure is key to obtaining accurate 3-D data. The sensors are provided with automatic setting of an optimum exposure (with manual override, if desired). Also included are a dynamic exposure setting which automatically adapts to surfaces that vary over time, and multiple exposures for objects that have varying surfaces within a single profile exposure.
Another key to simplicity of implementation is availability of built-in measurement tools for profile dimensions, eliminating the need for users to develop application specific measurement software. These tools include functions such as length, width, height, angles, vertex locations, groove dimensions, gap and flush gaging, and many more common metrology requirements. Multiple tools can be implemented for a profile, and each measurement can have max/min limits set for pass fail decision making.
Further measurement tools are provided for volumetric measurement applications requiring parameters such as area, volume, heights, centroid, ellipse and bounding box parameters. These whole part tools measure the entire part rather than analyzing a series of profile scans makes implementation of volumetric measurements easy. The tools automatically detect the edges of a component so that the whole part can be scanned and measured, and can automatically detect and track multiple parts on a conveyor.
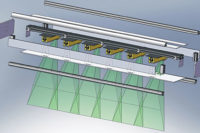
Often, applications require use of multiple 3-D sensors. Measurement of thickness of web materials may need sensors above and below the web to measure thickness differentially, with accurate results even when the material position changes. Large objects requiring high resolution measurements may need multiple sensors placed across the object, covering all critical areas. For applications requiring multiple sensors, capability is provided to connect up to 24 sensors in a single inspection station through a selection of masters. An open source SDK can be used to multiplex data and synchronize sensor timing to eliminate cross talk and control station operation.
Some factory automation applications require both 3-D profiles for measurement and 2-D images for surface inspection for defects or reading bar codes on the part. Adding a 2-D sensor would add cost, and requires synchronizing of the 2-D and 3-D images. For these applications, an intensity output function uses laser intensity to produce a synchronized grey scale image, calibrated to actual dimensions. Intensity output data can be combined with 2-D image processing libraries to easily identify surface defects and patterns.
The new sensors are factory calibrated for measurements. Further calibration of installed sensors may be required to compensate for mounting alignment errors, or to calibrate travel data for conveyor or other moving part applications equipped with an encoder. To simplify these needs, automated alignment and travel calibration is provided, based on known dimension artifacts.
After data is collected, it must be communicated. To simplify communications, the sensors are provided with user selectable outputs, including Ethernet, two digital channels, analog and serial outputs. For PLC based systems, the sensors also support EtherNet/IP and Modbus TCP protocols.
All-in-one sensors, with embedded web browser interface, get users from setup to measurement in minutes. Built-in measurement tools make it easy to configure 3-D measurements such as width, thickness, angles and even volumetric tools, all easily configured from a web browser. Implementing 3-D sensing for measurement and control is no longer as hard as you thought.
Tech Tips
|


