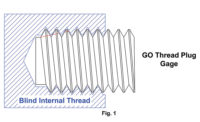
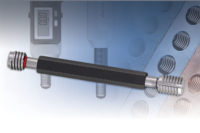
The measurement of the depth of thread on an internal thread can be challenging. A quick and accurate way to check thread depth is to modify the go thread plug gage by adding a depth notch or depth step to represent the functional thread depth.
The depth notch is a visual or sight measurement of the internal thread depth. It is used as a pass/fail inspection of the functional depth of thread. The purpose of this is to ensure that the screw, bolt or other external thread will be able to fully assemble with the internal thread to the designed depth. The notch may represent the minimum thread depth (one notch), the maximum thread depth (one notch), or both minimum and maximum (two notches). If the minimum depth notch on the go thread gage is at the face or inside the entering thread in the internal product thread, the minimum functional thread depth has been achieved. If the depth notch represents the maximum depth, then the notch should be above the face of the part or start of the thread. In the case of a min/max depth notch, the bottom (min) notch should enter the thread and the top (max) notch should not.
The keys to ensuring that the correct thread depth has been achieved will be found on the detailed part drawing. The gages must match the requirements of the part. The greatest area of concern dealing with thread depth is the location the depth is measured from and to. Generally thread depths are designed to be measured from the center line of the first full thread in the bottom of the threaded hole. This means that the gage must also be manufactured to measure from the same location. The depth notch on the go thread plug gage is usually ground 90 degrees to the axis of the gage. The flat is ground in a location on the circumference of the thread that will bisect or split the crest of the thread. This allows for the most accurate and visible notch.
There are a number of other features that need to be noted. Blind holes (a hole that does not pass through the part), drill points, radii, chamfers, or flat bottom holes will cause the gage to be altered to ensure that the functional thread depth may be inspected accurately and without interference from these or other features. In the cases where the threaded hole could have interference with the convoluted portion of the thread gage, the face of the gage may be ground back to within 0.5P (1/2 pitch) to the center line of the first full thread. (Convolution is the removal of the incomplete thread on the front of the thread plug gage.) This operation removes any portion of the gage that would extend beyond the first full thread. This then allows the thread to be inspected to the bottom of the full thread.
On gages with pitches of 28 threads per inch and finer, a 60 degree chamfer from the axis of the gage is acceptable in lieu of the blunt start/convolution (see ASME B1.2-1983 or Fed-Std-H28/6A). Chamfered, small diameter and fine pitch thread gages can make it difficult to grind accurate depth notches. One problem is that those thread gages #8 and smaller or finer than 28 threads per inch are usually chamfered instead of convoluted. The location of the first full thread on the chamfered gage becomes a problem. Grinding a notch into a small diameter thread can greatly reduce the strength of the gage as well. These smaller threads also typically have a 60 degree male center. When inspecting threads #8 (0.164) and smaller in blind holes, it is advisable to request that the point be removed from the go gage. The no-go gage may need to be altered as well.
While this type of thread depth inspection will not provide an actual “measured” thread depth, it does provide a “functional” inspection of the threaded hole. The purpose of the functional inspection is to ensure the assembly of the mating parts.


