Industrial robots have become part of our everyday life. In a 2013 report released by the International Federation of Robotics (IFR), the year 2012 yielded the second highest number of robots sold worldwide in the period of one year. Of the 159,346 units sold, nearly 70% of those units went to the United States, Japan, Germany, China and Korea. The automotive, food, chemical, rubber and plastics industries saw an upsurge in orders for robots, while the metal and machinery industries were slightly down. The IFR also reported another interesting trend for the U.S.—robot shipments rose again by 9% to a new peak level of 22,414 units in 2012 compared to the previous year, while sales had already climbed substantially in 2010 and 2011. The IFR President’s Report stated market data for the first three quarters of 2013 showed a further increase as compared to the same period last year.
Even if you do not see or use these robots on a daily basis, they are working behind the scenes nonetheless. They helped to build the car you drive, the phone constantly within your reach, and the computer you depend on. It would nearly be impossible to go a full day and not come in contact with something created using these great machines. The progress has been amazing considering this level of factory automation was just a pipe dream not long ago. As robots become more precise and intelligent, the more tasks they can perform, thus spreading their usage further into new industries and applications.
Moves toward Accuracy
There has been a burning desire to make these electro-mechanical machines more accurate since the introduction of industrial robots for factory automation. In the 1970s and ‘80s, robots were widely integrated into automotive manufacturing, but seldom used in aerospace manufacturing. They were simply not accurate enough to accomplish the required tasks. In the late ‘80s and early ‘90s, many of the robot manufacturers started to find ways to address this issue.
By nature, industrial robots are quite repeatable, but their absolute accuracy is very poor. For instance, if a program instructs the end effector of a robot to move 30 inches in the “Y” direction, it may move 31 inches rather than the desired 30 inches. However, it would move the same 31 inches every time. Because their actions are repeatable, robots could be compensated to a level of absolute accuracy. By measuring the robot in a set number of poses, the link lengths, twist angles, joint zeros, link offsets, and stiffness parameters could be intrinsically calculated to correct the robot model.
The main difficulty was how to measure the robot through all of these poses over varying temperature ranges with a high enough accuracy to create a worthwhile model. At this point in time, the “go to” device for precision distances and even angularity measurement was the laser interferometer. The problem with laser interferometers was they required precise guidance of a retroreflector to avoid laser beam interruption. As the reflector is moved in line with the laser beam, the direction of movement and a count of the wave peaks are recorded. The exact change in distance can then be calculated when multiplied by half the wavelength of the laser. However, if this counting process is interrupted at any time (i.e. by interrupting the beam), the whole process has to start from the beginning and from the exact initial reflector position. This limitation alone was enough to keep laser interferometers from being widely applied for robot compensation. Other early solutions such as laser triangulation and optical string pots were researched and tested, but nothing feasibly provided the ease of use and accuracy that was required.
In the early 1980s, a handful of organizations banded together to try to solve the precision guidance limitations of the laser interferometer through various “tracking” systems. Experts from the National Bureau of Standards (NBS) which is now NIST, the University of Surrey in England, and the FhG Karlsruhe in Germany worked on projects based on integrating a laser interferometer with a tracking system to create a laser tracking interferometer. Toward the end of the decade, companies in the U.S. and Europe began working on the concept of a laser tracker for industrial measurement applications, a system that could be used in a production environment outside of a laboratory. In 1990, a newly redesigned laser tracker was introduced to the world at the 1990 Quality trade show in Chicago.
In the early to mid ‘90s, laser trackers began to find a home in robot calibration. Calibration software was developed to instruct a robot to move to coordinate locations in a work area, then record the actual positions as measured by a laser tracker. By comparing the theoretical and actual positions, the software would create a set of compensation parameters that would correct the robot‘s positioning and thereby its movements. The parameters would take into account both the mechanical imperfections in the pattern of the movements and the bending or distortions downwards caused by the loads. This absolute accuracy calibration would correct a robot with variability between 8 to 15 mm, down to about 0.5 mm.
Most large robot manufacturers offered similarly compensated robots throughout this period. However, each manufacturer had their own proprietary process and customers with robot types from different manufacturers were left without a way to harmonize calibration processes and platforms. This dilemma lead to a number of companies offering robot calibration packages for these cases. These software modules can allow any manufacturer’s robot to be calibrated both extrinsically (located in the workspace) and intrinsically (link lengths, twist angles, etc.). Some software packages also compensate for the effects of thermal variation on the robot.
For example, when you use a robot that has been sitting idle, it will physically expand as it heats up from the thermal expansion of its links. As a robot continues to warm up, the change can be as great as 0.5 mm (0.020 inch) or more, which can significantly impact repeatability of measurements. However, the calibration software can calculate and remove these thermal effects from the measurements so they are consistently repeatable (typically within 0.10 mm, or 0.004 inch 6 sigma).
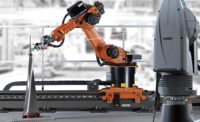
Today, these processes are well established and used on an almost daily basis. But that does not mean there is no room for further advancements. Within the last decade, laser trackers have improved greatly in functionality. One of the most significant improvements is the ability for a laser tracker to measure in a full Six Degrees of Freedom, or 6DoF. This capability allows robot manufacturers to correct the end effector of the robot during a calibration cycle with less poses, but it has also opened up new possibilities. In the past when using a traditional 3-D laser tracker, multiple positions had to be measured to calculate the tooling center point (TCP) in 6D space. Now by using a 6DoF laser tracker, it is possible to know the exact location of the end effector in 6D space in real time. This innovation removes the need for robot calibration completely as the tracker can monitor and correct the position of the end effector in real time without the need to worry about what the robot is doing in “joint space.”
This advanced technology was recently applied at Premium Aerotec (Nordenahm, Germany) to automate the process of placing stringers for the fuselage section of the new Airbus A350 XWB. Because the stringers were up to 18 meters long, the specified absolute accuracy of the robots being used still were not accurate enough to place them correctly. The team was only able to meet their stringent accuracy requirements by correcting the robots in real time based on feedback from the 6DoF Absolute laser tracker.
Automated cells based on robots and mobile measurement systems are no longer viewed as futuristic, and these implementations have grown substantially in a worldwide scale. As a result of this intelligence, a variety of manufacturers and industries are investigating their processes with fresh eyes, setting their sights on areas where measurement and inspection automation can play a vital role. In the midst of a paradigm shift, manufacturing history is changing right before our eyes.
Tech tips
Within the last decade, laser trackers have improved greatly in functionality.
One of the most significant improvements is the ability for a laser tracker to measure in a full Six Degrees of Freedom, or 6DoF.
This capability allows robot manufacturers to correct the end effector of the robot during a calibration cycle with less poses.


