“We’ll just put a camera there.”
Sounds easy, doesn’t it? While machine vision doesn’t have to be difficult, there is certainly more to it than just identifying a spot for a camera. Of course you will need a camera, but you will also need a lens, a light source, a processor, and a program. For some applications, you will need additional components like optical filters and mirrors. Finally, you have the challenge of the interface between the machine vision system and the other equipment in the system. This article outlines the components of a machine vision system and some of the considerations you will make in picking them.
For some applications, you will need additional components like optical filters and mirrors. Finally, you have the challenge of the interface between the machine vision system and the other equipment in the system. This article outlines the components of a machine vision system and some of the considerations you will make in picking them.
TECH TIPSPicking the right camera is important, and that camera needs to be supported with the selection of the right lens, lighting, processor, and software.
Experienced machine vision engineers agree that the most common cause of difficulties A lighting technique that might work satisfactorily for you on the engineering bench might be unreliable in a manufacturing environment. |
We’ll discuss the five basic components: camera, lens, light source, processor, and program. Let’s start with the camera.
Your first consideration in picking the camera is the image resolution needed. Image resolution is the number of rows and columns of pixels on the image sensor in the camera. The higher the image resolution the more detail your vision system can resolve on the part and the higher your vision system’s measurement precision can be. However, higher image resolution creates more image data for transmission and processing, and may limit the speed of your vision system. Also, higher image resolution requires a higher quality and more expensive lens. If you are not sure what camera will work, seek help from a responsible camera supplier, integrator, or other resources to pick the image resolution.
Camera Considerations
The next camera characteristic you need to consider is whether to use monochrome or color imaging. Usually this will be an easy choice for you. If your application does not require identification of color or if it only requires discrimination between two distinctly different colors, then clearly you should choose a monochrome camera. The majority of machine vision applications use a monochrome camera.
For those applications where color discrimination is required, such as in sorting food for ripeness or blemishes, you have two basic choices: single chip color cameras and three-chip color cameras. Most color machine vision systems use a single-chip color camera. This single image sensor chip has an image sensor exactly like a monochrome camera except that each pixel has a color filter over each pixel that responds only to red, or green, or blue light. The most common arrangement of these color filters is the Bayer pattern which consists of one row of alternating red and green filters, and the next row consisting of alternating green and blue filters. Circuitry in the camera interpolates signals from the pixel data to give a red, green and blue value for each pixel.
The image resolution specified for the single-chip color camera is the total of the red plus the green plus the blue pixels. So, the true image resolution for the red color in your single-chip color camera is one-quarter of its specified image resolution. You must take this reduction of image resolution into consideration when picking a single-chip color camera.
Three-chip color cameras are similar to high-end broadcast cameras. They have a prism assembly that splits the incoming light in three directions by its color, and three carefully aligned image sensors—one in each of the three color paths. The three-chip color cameras give you the best performance, but at a very significant price premium.
Another consideration you have in picking a camera is its interface to the processor. In smart cameras, the camera and processor are integrated together and there is no camera to processor interface for the user to consider. Except in Japan, where analog cameras are still widely used in machine vision, all camera interfaces are now digital. There are several choices: USB 3.0, Camera Link, GigE, HS Link, and CoaXPress. A description of the characteristics of these interfaces is beyond the scope of this article. However, some of these interfaces (Camera Link, HS Link, and CoaXPress) are intended for very high image data rates. If you use them, you will need a special camera interface board, called a frame grabber, installed in your processor. The other interfaces (USB 3.0 and GigE) plug directly into a computer without needing a frame grabber, and provide you with satisfactory image data rates for many machine vision applications. Your camera supplier, integrator, or other expert can advise you about which interface will be appropriate for your application.
Select a Lens
After you select the camera, you will need to select a lens. Obviously, the lens must mount to the camera, but it must also provide the right magnification and working distance as well as be compatible with the image resolution. The most popular lens mount is the C-mount. For really compact cameras you will have much smaller lenses available, and for larger, higher resolution cameras you will have larger lenses with different lens mounts to use.
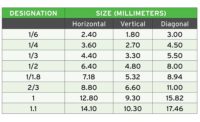
In setting the magnification, you need to know the image sensor size (HI) from your camera data sheet and your required field-of-view (FOV) size. Magnification (M) is simply the ratio of HI to FOV. The focal length (F) of the lens is determined by the magnification and the working distance (WD) you require. It can be estimated from the formula:
F = WD x M / (1 + M)
In order to avoid difficulty in finding a lens, be prepared with some flexibility in the working distance or in the size of the field-of-view.
The lens also has a resolving capability that varies with the magnification. The lens’s resolving capability must match the camera’s image resolution and the pixel size on the image sensor. It is best to seek help in selecting a lens from a lens supplier, integrator, or other person who has experience in picking lenses.
Consider Lighting
The next component you need to consider is the light source. Experienced machine vision engineers all agree that the most common cause of difficulties with machine vision application is problems with picking the right lighting. A lighting technique that might work satisfactorily for you on the engineering bench might be unreliable in a manufacturing environment.
There are two basic approaches to lighting: backlighting and front lighting. In backlighting, you position the light source on the side of the part opposite the camera. If the mechanical constraints allow backlighting and the part’s features are visible from its silhouette, then backlighting usually gives you the highest contrast image.
In front lighting, you position the light source on the same side of the part as the camera. The light reflects off the part to get to the camera. Front lighting can be sensitive to variations in reflection, texture, height or slope of the part’s surface. Still, front lighting is the most common form of lighting for machine vision applications. You have a number of different front lighting approaches from directed spot lights that cast distinct shadows, to ring lights that produce fairly uniform illumination, to on-axis diffuse illuminators and dome lights that produce near shadowless illumination. It takes significant experience to efficiently pick a good lighting source for a machine vision application.
Processor Options
Next you can consider what processor to use. There are three basic choices: a personal computer, an embedded processor in the camera, or a separate dedicated processor. A large fraction of the machine vision systems being designed use the personal computer or a derivative of it. This choice gives you the most value in processing power, an environment that is well supported with software and available programmers, and the ability for one processor to handle a large number of cameras.
When the processor is embedded in the camera you have a “smart camera.” Smart cameras are widely used in machine vision. For a single camera application, a smart camera may be the simplest and most cost effective approach. However, a PC or laptop computer is usually required to program the smart camera. When your application requires more than two cameras, often smart cameras will not be the lowest cost alternative, but you may still find them attractive for other reasons such as ease of maintenance if you are already using smart cameras in other applications.
A smart camera may come with a lens and sometimes a ring of light-emitting diodes (LEDs) to provide illumination. The lens is usually provided by the supplier to be compatible with your application requirements. While the smart camera’s ring of LEDs works satisfactorily in some applications, for most applications, you will need a different light source to achieve acceptable illumination.
Some OEM equipment designers find it cost effective to use an embedded computer for the image processing required by machine vision. This approach is economical in volume, but requires much more up-front engineering than a smart camera or PC-based vision system and is generally inappropriate for end users or very experienced system integrators.
What Program to Use
The final element of the machine vision system you need to consider is the program for interfacing to the camera, processing the image, and interfacing the results to the other automation components. Fortunately, machine vision vendors made significant progress in this area over the past two decades. Most smart cameras come with software that can be configured for an application, including the interface, without any computer programming. Many of these smart cameras use drag and drop graphical programming where the specific functions are pulled into a workspace, connected with lines to other functional blocks, and then adjusted by changing properties to give the best performance.
More sophisticated image processing is possible with high-level software libraries. These libraries give the programmer access to a vast spectrum of image processing functions. While these packages enable the development of very sophisticated and powerful image processing, they require expertise in image processing and in the specific software package.
So, next time someone suggests, “Let’s put a camera there,” remember that there are considerations in picking the right camera, and that camera needs to be supported with the selection of the right lens, lighting, processor, and software, too.


