Manufacturing has made increasing use of traditional 2-D machine vision inspection, optical character recognition (OCR) and ID reading systems, which increase quality, improve throughput and reduce costs. But there are numerous applications that are better suited for 3-D vision such as measuring height, volume and tilt of parts or reading raised characters against a similarly colored background, and performing inspections in variable lighting conditions. These challenges are being addressed by a new generation of 3-D vision systems that utilize laser triangulation in combination with a 2-D imager to generate a 3-D topographical profile of an object that can be used for measurement, inspection or character recognition.
Three-dimensional vision systems are able to perform all types of 3-D measurements that read characters and codes, independent of contrast or lighting conditions. Another advantage of 3-D vision systems is that they can provide real world measurements to micron level accuracy without being specially calibrated for the application. For many manufacturing applications where 2-D inspection is limited, 3-D vision systems provide substantial performance upgrades that can improve quality, throughput and efficiency.
TECH TIPSThe successful deployment of a 3-D vision application involves having the right hardware, vision tools, development environment, and communication to the factory floor that has been assembled and tested as a complete solution. Three-dimensional vision systems are able to perform all types of 3-D measurements that read characters and codes, independent of contrast or lighting conditions. For many manufacturing applications where 2-D inspection is limited, 3-D vision systems provide substantial performance upgrades that can improve quality, throughput and efficiency. |
While traditional 2-D machine vision systems can provide excellent performance on the vast majority of inspection and barcode reading applications, there are a considerable number of applications where vision systems run into the inherent limits of 2-D technology. Typical examples include applications that are inherently 3-D, such as measuring the height of an object, parallel to the surface of the sensor; measuring the slope of a surface that is tilted; measuring the volume of an object; or evaluating the profile of an object.
Another concern in OCR and applications lies where characters or codes must be distinguished against a background that is either of a similar color or where it is difficult to distinguish the foreground from the background. There are also many machine vision and ID reading applications that consist of challenging lighting problems which can be addressed through the use of 3-D technology.
Advent of 3-D machine vision systems
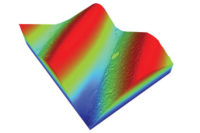
A new generation of 3-D vision systems is addressing these challenges by using laser triangulation to extract 3-D information from parts. A laser displacement sensor projects a beam onto the object to be measured. The beam is displaced by the 3-D shape of the object. The image sensor captures a 3-D topological representation of the 3-D image where the footprint of the object is represented by the extent of the image, and the z height data is stored. A complete 3-D image is generated from a series of acquired profiles where each row of the image corresponds to one profile, resulting in a 16 bit greyscale image. The resultant 3-D image of the object can be used to both locate the object, and accurately register vision tools for the purpose of measuring 3-D and 2-D features, such as length, width and height. It can be used to easily determine presence or absence of an object regardless of color or lighting and yield a high-contrast image from very subtle changes in height.
3-D inspection applications
Consider the sprocket gear shown in Figure 3 that looks good in the x and y dimensions. But a 3-D inspection reveals that a tooth is broken with the top 10 millimeter of height missing. One could also imagine a case where only the top surface of the tooth is missing, as opposed to the entire tooth, and clearly 3-D inspection is required to identify a defect of this type. Another typical 3-D inspection application involves measuring the flatness of a critical component such as a printed circuit board (PCB) or a substrate in a carrier. Skewing or warpage of components cannot be detected with 2-D inspection.
However, 3-D machine vision can easily determine the complete topographical profile of the part surface. Detecting the presence or absence of components whose color is similar to the area where they are supposed to be installed is another very common 3-D inspection application. There are also many robotic guidance applications where 3-D vision is required, such as picking parts out of a bin or guiding a robot arm around multiple surfaces of a part.
In the electronics industry, inspection of substrates in carriers is required to determine if a substrate is missing, too high or low, or tilted. An advantage of 3-D machine vision in this application is that it can determine the height of the substrates with respect to the carrier. For example, if the carrier itself is higher than normal, it will not cause all of the substrates to be mistakenly identified as too high. Likewise if the entire carrier is tilted by a few degrees, the overall tilt of the carrier can easily be factored out to measure what is really important—the tilt of each substrate with respect to the carrier.
Automotive manufacturers need to record the Department of Transportation (DOT) codes on the sidewalls of tires that are installed on vehicles. The codes are molded and raised on the surface of tires, but are the same color as the tires. Two-dimensional vision systems can be used to perform OCR on the codes but require precision lighting which must frequently be re-adjusted when new tires are introduced. Three-dimensional vision systems, however, produce a high contrast image from very small changes in the geometry so they can provide a much more reliable and robust solution.
3-D vision systems
The working area of the sensor depends on its field of view (FOV). The area that can be measured by the sensor consists of a trapezoidal tunnel and as long as the part or feature to be measured is contained within this tunnel the sensor will be able to perform 3-D measurements on it. Sensors with a small FOV offer the highest resolution so they are well suited for inspecting smaller objects at the highest possible levels of precision. On the other hand, sensors with a larger FOV are capable of inspecting larger objects with a greater clearance distance, although with less precision than sensors with a small FOV.
Calibration is important for all vision systems but especially for 3-D systems that need to make accurate measurements for dimensional gaging and robot guidance applications. Because the measurement range is fixed, the new generation of 3-D vision systems can be rigorously calibrated at the factory to real world measurement units, such as millimeters as opposed to conventional 2-D vision systems that require calibration on the factory floor for each application in order to convert from pixels to real world units. Three-dimensional vision systems also handle extrinsic calibration, which refers to calibrating the position of the camera in the world, which is particularly applicable to situations where the camera is mounted on a robot and moved to the part being inspected. Software is also available to support hand-eye calibrations which are used to convert vision results into the robot’s motion coordinate system.
Three-dimensional inspection adds an extra layer of complexity to machine vision programming. However, 3-D programming environments have been upgraded to simplify the process of building maintainable 3-D vision applications. The typical development environment enables users to drag and drop 3-D and 2-D vision tools, use interactive editing controls to set vision tool properties and add plug-ins for external hardware. A graphical flowchart-based programming environment results in a diagrammatic representation that’s easy to understand, and can be supported by factory engineers.
Typical 3-D vision tools include a plane to plane angle calculator, a height calculator that can be used to determine minimum, maximum or average height, a plane estimator used to create a reference plane, a volume calculator and cross-section tool that captures a slice of an object for dimensional inspection. Typical 2-D vision tools used in 3-D applications include pattern matching tools that can be used to identify the presence and location of a specific geometric pattern, regardless of its orientation, as well as specialized tools for performing OCR.
Programmers can create a runtime operator interface to monitor and control the vision application simply by dragging and dropping controls and images. Results or decisions can be communicated through physical I/O, factory floor communications such as Ethernet/IP or ProfiNet, and monitoring equipment can also be connected. The final step is to deploy the application on a dedicated vision controller or industrial PC. Critical to the successful deployment of a 3-D vision application is having the right hardware, vision tools, development environment, and communication to the factory floor that has been assembled and tested as a complete solution.
Conclusion
In contrast to traditional machine vision systems that provide information in two dimensions, 3-D simply provides users with more information about their manufacturing processes and products, allowing manufacturers to apply machine vision to a larger range of applications on the factory floor.


