One of the questions our applications team is most commonly asked is “Why aren’t my systems producing the exact same results?” Over years of applications consulting, we have found that optimizing the test configuration by instructing labs to use the same method files, implement standard operating procedures (SOPs) and use equivalent test setups is the best way to minimize test result differences. However, application engineers can only do so much as differences do exist in the real world. For example, every mechanical testing system is different, laboratories have different operators using their systems, different samples are actually being tested, and each specimen being tested is prepared with slight differences. There are many sources and reasons that may cause these differences and the sum of the differences may produce an overall error in the test results. Sources of error specific to materials testing are summarized in Figure 1.
While most users of materials testing equipment can understand these sources of error and do their best to minimize testing errors, eliminating error altogether is not possible. As companies grow, it is even more difficult to reduce sources of error between multiple test systems, multiple laboratories, and multiple geographic locations. Since error can never be eliminated, the next best option quality professionals have is to understand and quantify the error. One approach to both quantify and understand sources of error is to perform a gage repeatability and reliability (GR&R) study on a measurement system.
To adopt GR&R to materials testing, the gage is a test result (i.e. modulus), and repeatability and reliability relate to using the measurement system to obtain that gage. According to ASTM E177-14, Standard Practice for Use of the Terms Precision and Bias in ASTM Test Methods, the definitions of repeatability and reproducibility are as follows:
Repeatability: conditions where independent test results are obtained with the same method on identical test items in the same laboratory by the same operator using the same equipment within short intervals of time.
Reproducibility: conditions where test results are obtained with the same method on identical test items in different laboratories with different operators using different equipment.
The goal of repeatability is to determine how accurate the materials testing system is at measuring the gage. The goal of reproducibility is to measure operator variation.
GR&R is a common statistical tool. The purpose of a GR&R study is to uncover the cause of variation from a measurement device (or gage) and classify the source of this variation as either from the device itself or the operator of the device. As a lab’s capabilities expand, either by adding additional equipment or opening a new facility, it is important to first conduct a controlled experiment, such as a GR&R, to ensure repeatability can be achieved and the expected variance between systems can be quantified.
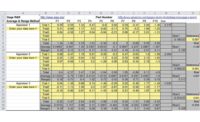
When designing a GR&R study it is important to select a range of materials that is representative of what the system will be used for. While more materials and more specimens can lead to a better output from the experiment, the number of tests required increases very quickly. In the example Figure 2 illustrates, three operators and three materials were used for each frame. This image represents one trial. Often at least eight to ten trials are used, although this number can vary depending on the design of the experiment. In this example, this would mean ninety tests per machine.
There are several commercially available tools that can help to design and analyze the results of a GR&R study.
Other tools
While GR&R has proven to be a useful tool for materials testing professionals to understand their sources of error, our systems for destructive materials testing are considered very complex compared to other gages that GR&R was originally intended to measure. For instance, materials testing systems have many parts: the frame, load cell, extensometer, grips and fixtures, software, and operator. Before performing a GR&R it is imperative that all these individual measurement systems are verified and calibrated. Our service team has the ability to calibrate and verify to international standards such as ASTM F74 and ISO 376 for calibrations and ASTM E4 and ISO 7500-1 for verification. Important verifications include: alignment, displacement, speed, temperature, and strain verifications. Force and creep calibration are also important.
Although equipment model, product generation, and software build often have little impact on error, the medical industry takes all possible sources of error seriously. The FDA 21 CFR 820.72 establishes practices for installation qualification (IQ) and operational qualification (OQ). IQ is an installation qualification process designed to establish that the measurement system is installed correctly. This process often documents installation conditions, operation of the machine and safety features, organization of system manuals and certifications, environment conditions, and preventative maintenance. IQ focuses on both the system and the software. OQ is designed to verify the proper operation of the testing system, and that the system is able to produce valid results. Within the OQ process, functionality of the software is checked and validation of any specific calculations would occur. For many medical device companies, IQ/OQ is performed, calibrations and verifications are completed, and then a procedural or process qualification (PQ) is conducted. PQ takes into account different operators and in some cases is a full GR&R study.
Conclusion
While there can be many reasons why different or even the same system are not producing consistent results, a GR&R study may help to understand why variation in testing results exists. GR&R identifies whether it is the measurement device itself or the operator that is causing variation. For some industries, like biomedical, there may be additional verification and calibration requirements that would prevent the likelihood of error. As organizations grow, there is an increased need to understand variations that can occur with different systems in different labs in different geographies, and a GR&R study is a way to ensure testing results are consistent and measurement is repeatable and reproducible.


