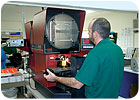
NEPG uses optical comparators from The L.S. Starrett Co. on its shop floor and in its metrology lab to help ensure that its products meet the stringent quality requirements of the medical device industry. Source: The L.S. Starrett Co.
Imagine working with wire diameters as small as 0.005 inch. Consider meeting tolerances within 0.0001 inch and maintaining angles within 1 degree. And then add in a fabrication process more commonly associated with large work pieces: centerless grinding.
That is all in a day’s work at New England Precision Grinding (NEPG, Holliston, MA), a company that produces micro-ground wire from 304 stainless steel and super-elastic nitinol for the medical device industry. The wire is used for needles and catheter-placed stents so small that their micro-miniature features cannot be seen with the naked eye.
NEPG has developed a proprietary centerless grinding process to meet medical requirements for ever-smaller devices. The wire NEPG uses can have a diameter as small as 0.003 inch or as large as 0.062 inch, and work pieces can be as small as a human hair-0.002 inch.
Precise Visual Inspection
NEPG demands inspection instruments that are fast and accurate. Optical comparators from The L.S. Starrett Co. (Athol, MA) reside on the company’s shop floor and in its metrology lab, helping to maintain a high standard based on associated quality.“We use a three-pan system with each pan containing multiple parts,” says Bill Robinson, quality assurance manager for NEPG. “The operator verifies the first piece on the optical comparator and runs the parts. The first part of pan two is checked. However the process is running, any variation from tolerance prompts a sort of the preceding pan, a process that calls for the visual inspection of each part on the optical comparator.”
Optical comparators are used first for the inspection of incoming materials, especially those that have been worked by a supplier.
“We visually check such processes as laser cutting, electro polishing, welding, EDM [electrical discharge machining] work and laser marking,” says Robinson.
From inspection, the raw material goes to the production floor for centerless grinding. Operators use seven Starrett optical comparators to check their in-process work. Roaming quality control inspectors randomly select pieces and view them on the optical comparators.
The optical comparators use lenses capable of 50X and 100X magnification, depending on the size of the micro parts. For radius checks, overlays are used. When a sorting operation is required, a template helps complete the full inspection quickly.

The Starrett HB400’s 16-inch screen diameter provides a wide field of view with cross lines and calibration marks. Source: The L.S. Starrett Co.
Micro-Inspection Metrology Lab
NEPG uses two Starrett HB400 measuring projectors in its climate- controlled inspection room. While each grinding operation checks its work, the metrology inspectors check every dimension and angle of work selected at random. A broad range of Starrett gages, micrometers, slide calipers and other precision measuring tools are used, but the workhorses are the two Starrett optical comparators.The Starrett HB400, for example, is well suited to this type of intensive and varied inspection work. Its 16-inch screen diameter provides a wide field of view with cross lines and calibration marks. It provides a built-in digital protractor with DD/DMS conversion and 0.00005-inch resolution scales.
The centrally mounted vertical (Y-axis) scale is in line with the lens and the work piece for a vertically correct image. While the dual fixturing slots can handle work pieces up to 110 pounds, NEPG’s typical part weighs in at fractions of an ounce. Dual intensity tungsten halogen bulbs provide sharp profile illumination and twin-bundle, adjustable on-axis fiber optic surface illumination.
NEPG uses 50X and 100X magnifications in the lab to match the magnifications used on the production floor. The system enlarges part features to ensure the production line is holding its tolerances, ±0.0001 inch and within 1 degree for angles.
A full inspection of a part by the metrology lab may involve checking up to eight dimensions. Each inspector performs 20 to 30 full checks of incoming material, in-process work and post-production finished goods.
“The Starrett projectors have enabled us to reduce inspection times from as much as 4 to 4.5 hours to just 25 minutes,” says Jim Phillips, lead inspector for NEPG. “We like the way the Starrett system works, especially its ability to handle a wide variety of work sizes. We trust it.”
“The Starrett optical comparators are critical in this work,” adds Robinson. “Our operations would be impossible without them. Yes, there are alternatives, such as computer vision systems, but they have to be programmed. Our optical comparators are the most efficient, fastest and accurate way to inspect parts without the need for complicated setups.”
Medical Trials and Tribulations
While NEPG is now producing as many as 50,000 pieces annually for some micro-ground wire products, the path to that success is as difficult as the tests and measurements to which the company subjects its work.NEPG has found ways to adapt its operations to the lengthy medical product development cycle. Its commitment to precision and quality has attracted business from some of the largest companies in the medical products field. NEPG is developing methods to make even smaller products, some involving the equivalent of grinding features on the point of a pin.
While its products seem to be getting smaller, its business is growing much larger. The NEPG five-year plan calls for aggressive growth, which will depend on working and inspecting at the micro-level, operations that require the ability to view and measure precisely what the human eye cannot see. Thanks to Starrett precision measuring equipment, NEPG is helping medical OEMs meet the demand for very small medical device components.
The L.S. Starrett Co.
(978) 249-3551
www.starrett.com