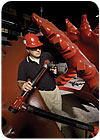
Esco has quality practices in place for each part, every step of the way as it is being fabricated. Once assembled, it is easy to take the Romer scanner to their large parts, and gather critical precision data for analysis. Source: Romer Inc., a Hexagon company
In a fiercely competitive global economy, quality matters now more than ever. And no one knows the pains and gains of sustaining effective quality control better than Esco Corp. (Portland, OR), a long-time power player in the design, manufacture and distribution of products for mining, construction, power generation and aerospace applications. In its facilities worldwide, Esco celebrates a culture of lean manufacturing and continuous improvement through quality management systems that are third-party certified. The benefactors are their customers who use Esco products to dig deep within the earth, fly high at 35,000 feet, provide energy to pump oil, and build bridges and freeways to keep communities moving and prospering.
Like any department, those responsible for product quality must make the business case for its initiatives and expenditures. At Esco, the dimensional/gage department wanted to streamline quality control for new product development based on metrology hardware and software that could provide high usability, portability and on-demand inspection. These all sound like reasonable items on a wish list, but then most ordinary manufacturers fabricate several products at most. In order to understand their metrology needs, one must take a quick assessment of Esco’s very large and diverse product lines.
For mining and construction applications, Esco manufactures ground-engaging tools, buckets, blades, end bits, couplers, wearparts, ripper systems, shanks, lip systems, dozer packages, liner packages, shrouds and structural components. The company also builds dredging cutterheads, teeth and components, as well as rigging products such as swagers, swage fitting, dies and spelter sockets. Their recycling product line is comprised of hammers, shredder hammer assemblies, grates, rotor caps, liners and other key components. Esco conveying products include long link sprockets, drums, chains, flights, drag chain sprockets, traction wheels, engineered chain, mill chain and chain attachments.

Taylor Finley, dimensional/gage engineer, demonstrates the capabilities of the scanner with an inspection of a cutter head from Esco’s dredging division. The Romer ScanShark portable measurement system is used for data acquisition. Source: Romer Inc., a Hexagon company
Wanted: Ultra Flexible Inspection
The dimensional/gage department ensures product quality in two ways. One way is physical gaging, which is fixturing on the shop floor that is used by the manufacturing department to ensure a product is built to specifications. The fixturing is developed, designed and built in-house and distributed to all facilities. The other way is soft gaging, which is the use of software, coordinate measuring machines (CMMs) and CMM programming to inspect product in a process-controlled environment for the rigors of new product development.The department uses a traditional bridge Brown & Sharpe CMM to inspect many parts automatically using pre-written programs. But the company found itself in need of a solution that could measure very large parts that fall outside the CMM’s measurement envelope.
Taylor Finley, dimensional/gage engineer, explains, “We needed to add a new tool for in-place measurement of our large parts that required no up-front programming. Many engineers working on new product development need to do a quick inspection by themselves without having to go through an operator or an engineer to program a one time inspection. We wanted a system that an engineer with little or no experience could learn and operate quickly. It takes a lot of metrology experience to run a CMM and program CMM software, taking one to two years to train the operator. Our parts are becoming more and more complex. We are not dealing with simple surfaces anymore, but intricate contours which create a challenge to measure and verify our parts.”
Alex Rizzuti, lead engineer for the dimensional/gage department, explains, “The path to our ‘self-serve’ metrology program started with a survey sent out to engineering and manufacturing teams. They came back and said, ‘Your inspection systems are great, but we need to go farther. We want the ability to bring inspection equipment to the part, plus we would like to speed up the process of time to market.’ In a group discussion, we floated the idea of this self-serve system. It was an idea that would work with the right piece of equipment, and the majority of our team got on the band wagon.”
Self-Serve Metrology
The self-serve solution they settled on was the Romer (Wixom, MI) ScanShark V5 laser scanning system comprised of a seven-axis Infinite 2.0 portable CMM, a ScanShark laser scanning probe, PolyWorks software and a computer. The combination of articulating arm measurement with laser scanning enables maximum surface inspection of any large workpiece.The noncontact laser scanner acquires more than 458,000 points per second for detailed inspection of both geometric and surface features in a fraction of the time of probes with lesser capabilities. The 9 foot (2.8 meter) Romer Infinite seven axis scanning arm has a hemispherical measuring envelope of 18 feet and operates like a human arm. Its Zero-G counterbalance offsets the weight of the carbon-fiber arm and scanner for one-handed operation from any position in the arm’s reach, above and below the midline. The arm’s patented infinite rotation of the principal axes enables Esco operators to inspect hard-to-reach areas on their parts. The configuration also allows for point data acquisition with contact probes when needed, without having to swap the laser scanner for a contact probe.
“Speed to market is one of our biggest pushes,” states Rizzuti. “We cannot take five or six years to design a product. Giving the engineer a tool that would allow them to spot check their products immediately appealed to the group. Every one of our engineered products has a dedicated engineer and group. All quality work funnels through the dimensional/gage department, and we program all CMMs for our facilities worldwide. For continuous improvement and shortening time to market, work simply cannot sit around in the queue. So the self-serve model without the programming upfront is key to our effort. An engineer needing to verify a part can book the scanner when they need it, and acquire their data in a day.”
Short Learning Curve
Esco’s dimensional/gage department is comprised of seven engineers and two technicians designated with the responsibility of ensuring Esco fit products meet dimensional specifications. This group supports the nearly 40 product design engineers and five plant employees coming on board to learn the new metrology system. Today, 15 engineers are master users of the product.“The Romer/PolyWorks solution met our classification of a self-serve system based on the fact that with a small amount of training, any engineer or manufacturing person can check out the device when they need it,” explains Finley. “We spend about a full day of training stretched out over a period of three to four weeks to learn how to use the system and the software’s post processing tools and analysis features. We can teach an engineer with a rudimentary understanding of dimensions, tolerancing, and datum, and a general knowledge of how a part must behave-a complete novice to metrology-and have them fully trained in a month’s time. The Romer ScanShark and the PolyWorks software have been very adaptable to our in-house standards and procedures. With this model, we can get an inspection in 24 hours taking a fraction of the time to scan our parts, without upfront programming and practically no setup time.
“The range of the scanner arm gives us the ability to capture complex angles and work around fixturing, which eliminates multiple setups. The arm’s elbows and wrists make it easy for us to set up a part and move all the way around it. The PolyWorks software enables us to post process point cloud data, stitch surfaces, align data and do a complete inspection of a part using the basic analysis tools in the software, including color mapping to tolerances showing what is in spec or out of spec,” concludes Finley.
Rizzuti says that most of the off-the-shelf features of the PolyWorks software worked well for their applications. “The best part of the software is that we can customize the desktop for our engineers. Removing tools from the menu that we are not using helps us streamline the self-serve model. We give our engineers exactly what they need for the job at hand, so there is no veering off the path.”
Romer is a brand of Hexagon Metrology Inc.
(800) 218-7125
www.romer.com


