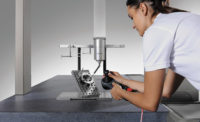
Caterpillar called on Hexagon Metrology’s special systems group to partner on designing and building a new cooling chamber outside of its metrology laboratory; scheduling and executing the implementation of the new system; and setting the workflow contingency plan into action. Source: Hexagon Metrology
Many a quality control manager agonizes over improving his inspection processes, maintaining productivity in his departments and keeping his metrology equipment running in peak condition. That same manager also knows that once you throw the ‘on’ switch to replace a coordinate measuring machine (CMM), a strategic contingency plan must steer the department in the interim period.
Paulo H. Pereira, chief metrologist at Caterpillar Americas operations division (East Peoria, IL), was facing what every manufacturing enterprise must eventually contend with-turning over old equipment and upgrading to new technology. In particular, one of Pereira’s large gantry CMMs was nearing the end of its lifecycle. As the precision instrument entered its twilight years, the effort to keep it running became increasingly difficult. Machine downtime escalated, and major maintenance investments were required to keep it going.

The CMM inspection process captures data on diameters, flatness, true positions, with hundreds of features on a single part. Source: Hexagon Metrology
Moving Out the Old, Bringing in the New
A new DEA Lambda SP coordinate measuring machine from Hexagon Metrology (North Kingstown, RI) was chosen as the replacement system. When compared to the old CMM, there were significant structural differences. The welded frame and the moving bridge were extremely heavy on the older model. The machine spanned more than 4 meters on one side and had a built-in walkway over the bridge.The new system’s moving parts are light and agile aluminum extrusions. This streamlined design allows the CMM to accelerate at faster rates and drive at higher speeds, giving it a throughput advantage. For a green bonus, the lighter weight CMM also operates using less power.
The new system would be used to inspect mostly large prismatic parts weighing thousands of pounds. The sturdy CMM is designed for applications requiring an extra-large measuring volume for dimensional inspection of oversized precision components such as turbines, marine engines and satellite parts. The gantry CMM architecture allows for easy part loading and integration with part transportation systems.
Not your father’s CMM, the DEA includes technical advances such as a dual drive encoder system on the main carriage, slant bridge technology and adaptive compensation of thermally-induced variations (ACTIV) structural thermal compensation.
The dual drive encoder system is installed on both sides of the large sliding carriage of the CMM and greatly reduces the tendency for the yaw motion of the axis. The dual drives essentially smooth out the motion of the carriage. The dual scales and encoders maintain side-to-side positioning accuracy of the carriage-up to four meters on standard machines and greater in nonstandard applications-particularly the wider X-axis capabilities of the Lambda. This system also allows geometric compensation on both sides of the carriage, rather than just a single side, which contributes to better accuracy.
Doubly Beneficial
The benefits of slant bridge technology are twofold. By tilting the surface of the air bearing guideways, the bearing spread can be made wider than a conventional vertical rectangular structure, while maintaining a lower overall profile. The wider bearing spread contributes to greater rigidity. The lower profile contributes to a lower center of gravity, which in turn contributes to lower deflection of the structure at higher rates of acceleration and velocity.ACTIV structural temperature compensation uses a network of temperature sensors placed in strategic locations throughout the CMM structure. These sensors monitor temperature at those positions, and software developed from extensive thermal modeling of the CMM structure provide real-time compensation. Compared to the older machine, the new CMM is far less sensitive to temperature fluctuations.
Making the Right Call
Choosing a replacement CMM was just the start of this particular project, which was more intricate than most system upgrades. Caterpillar called on Hexagon Metrology’s special systems group to partner on the project. The endeavor would entail designing and building a new cooling chamber outside of the metrology laboratory; scheduling and executing the implementation of the new system; and setting the workflow contingency plan into action. Caterpillar also would arrange for the removal of the older, heavier CMM.Like any major capital investment, getting approval for the purchase took several months. It also took a considerable amount of time to clearly define what the system should look like and to construct a contingency plan for inspecting parts when the old CMM goes offline and is removed.
The third piece of the puzzle was the construction of a cooling chamber near the metrology laboratory, where components queue up to be measured. Under the new plan, these large parts are placed on carts using overhead cranes and sent to the cooling chambers where their temperature is stabilized prior to inspection. According to international metrology standards, all measurements should be made at 20 C.
According to Pereira, a two-year implementation is certainly not out of bounds when executing a complex project, where steps are taken incrementally with the least impact to the production cycle and productivity. A good amount of planning takes place on both sides to determine the need and to make it happen seamlessly. Inspections had to continue even when one of the four CMMs in the department was shutdown. A thoughtful contingency plan was required to maintain operations.
Moving from an older CMM to a new, state-the-art CMM provides a wide range of advances introduced in the past decade. The DEA Lambda is precision-built for high speed, high accuracy inspection of huge components, that require open, modular, easily customizable structures with virtually unlimited measuring volumes. There is a 60% increase in maximum velocity and a 37% increase in acceleration by moving to the new CMM. This pure increase in dynamics, combined with increased probing speed and new scanning technology, enable the customer to experience a 40 to 50% increase in throughput on their part programs.
Hexagon Metrology Inc.
(847) 931-0100
www.HexagonMetrology.us
