Quality 101
Is it a Digital Caliper – or a Swiss Army Knife?
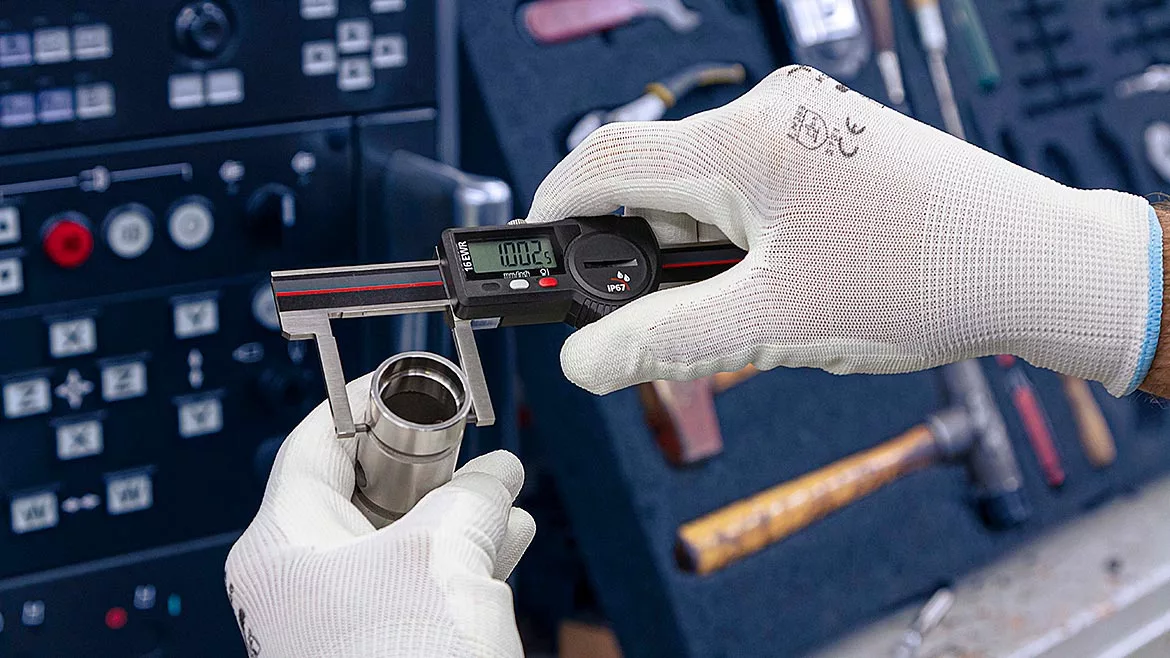
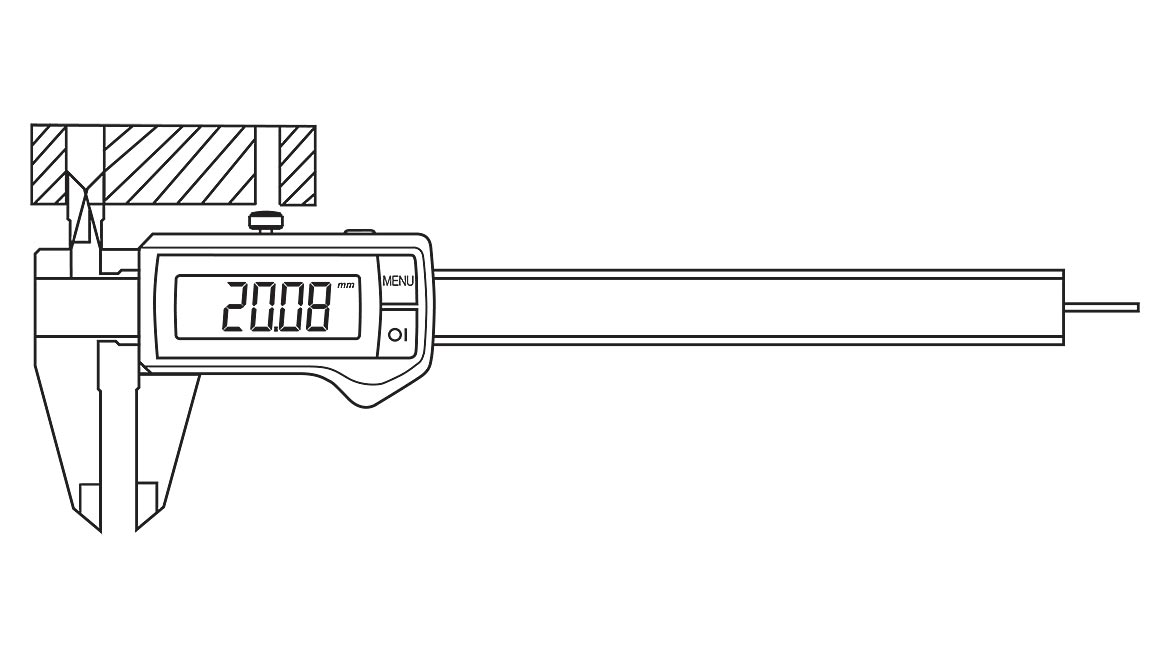
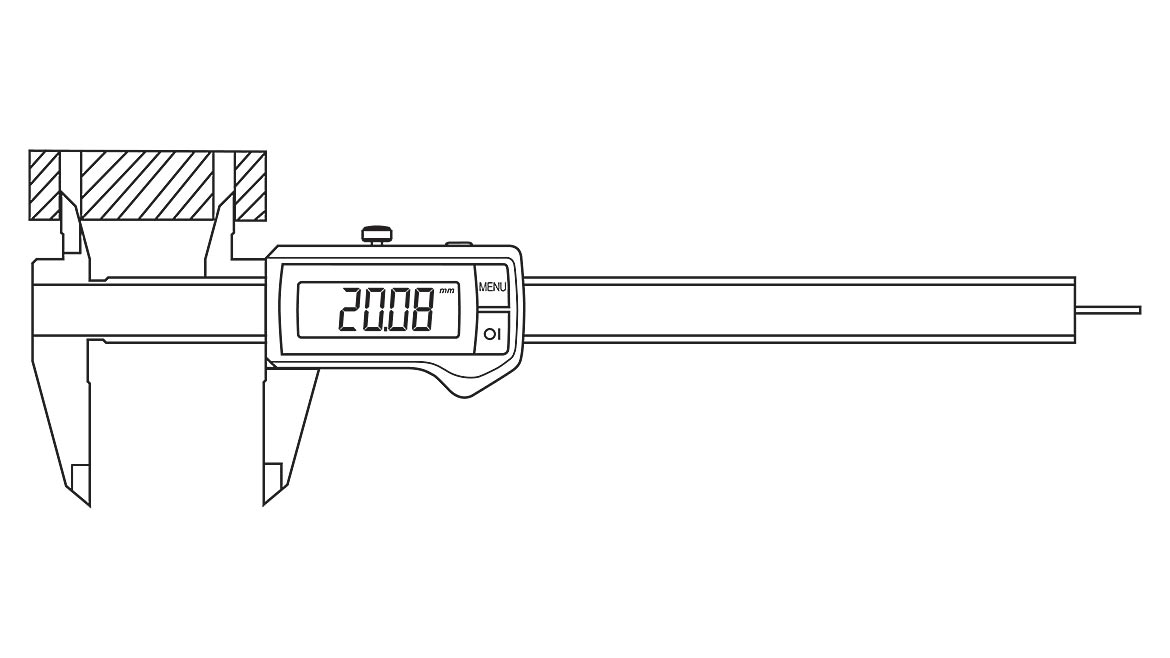
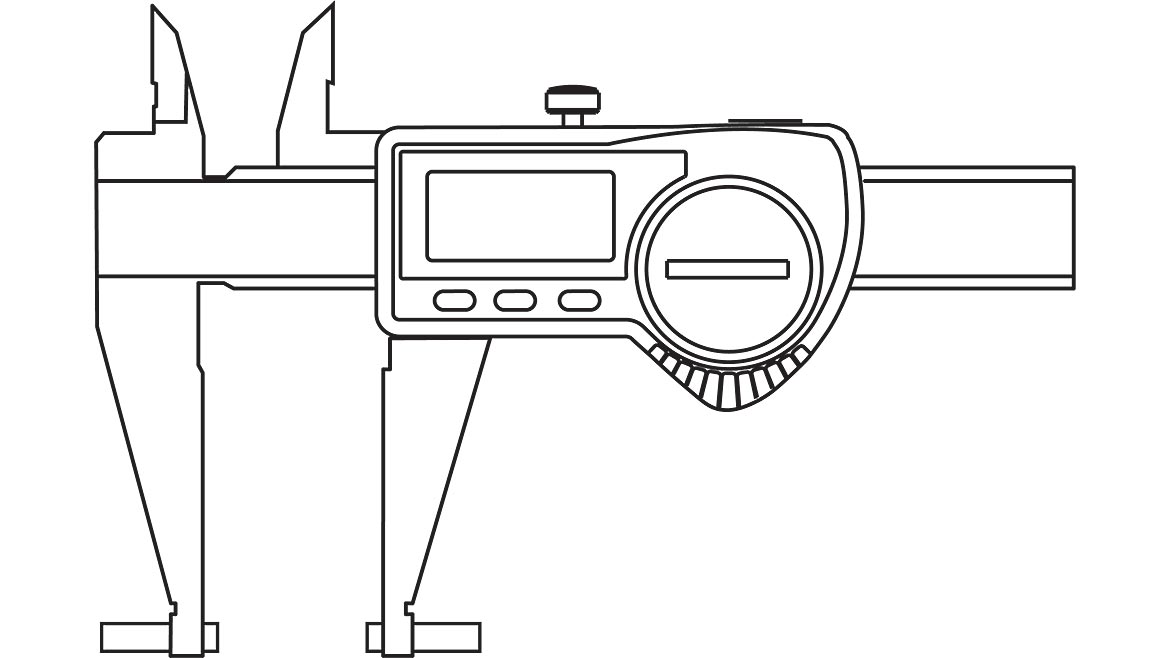
Even a digital caliper — which takes most of the guesswork out of reading the measured value — still requires skill to correctly apply it to the measured dimension.
All Images Source: Mahr
We are all familiar with the versatility of calipers—vernier, dial, or digital. On the shop floor, in the inspection room, or even now for the home hobbyist, the caliper is a fast and easy-to-use tool to make basic length measurements.
But while the caliper is a versatile tool, it is not one of the most precise. Skill is required for positioning and interpreting measurement results. As the user develops a “feel” for the tool, measurement results become more consistent.
Even a digital caliper—which takes most of the guesswork out of reading the measured value—still requires skill to correctly apply it to the measured dimension. The caliper’s jaws must be square or perpendicular to the part. They must be held firmly against the part but not to the point of deflecting them. The part should also be kept as close as possible to the frame of the measurement tool.
Here’s a basic three-step method for using a caliper:
1) Close the caliper so the jaws are together and “zero” out the display. Next, open and close the jaws several times, checking for a repeat of the zero setting. If there are a “couple of counts” of difference, re-zero and try again until you are convinced there is a good zero condition.
2) Measure the part. Here is where operator influence comes in. Make sure the caliper is parallel with the line of the measurement, i.e., that the caliper’s jaws are square to the surface being measured. This looks relatively easy on a part with parallel surfaces, but on an outside diameter, more care is needed. Similar to checking the zero repeat, check the measurement by repeating it a couple of times to ensure it is good.
3) Once satisfied with the measurement, remove the part and return to check zero. Just as when setting zero, make sure it repeats. An inadvertent zeroing during measurement may occur, or dirt may show a non-repeating condition.
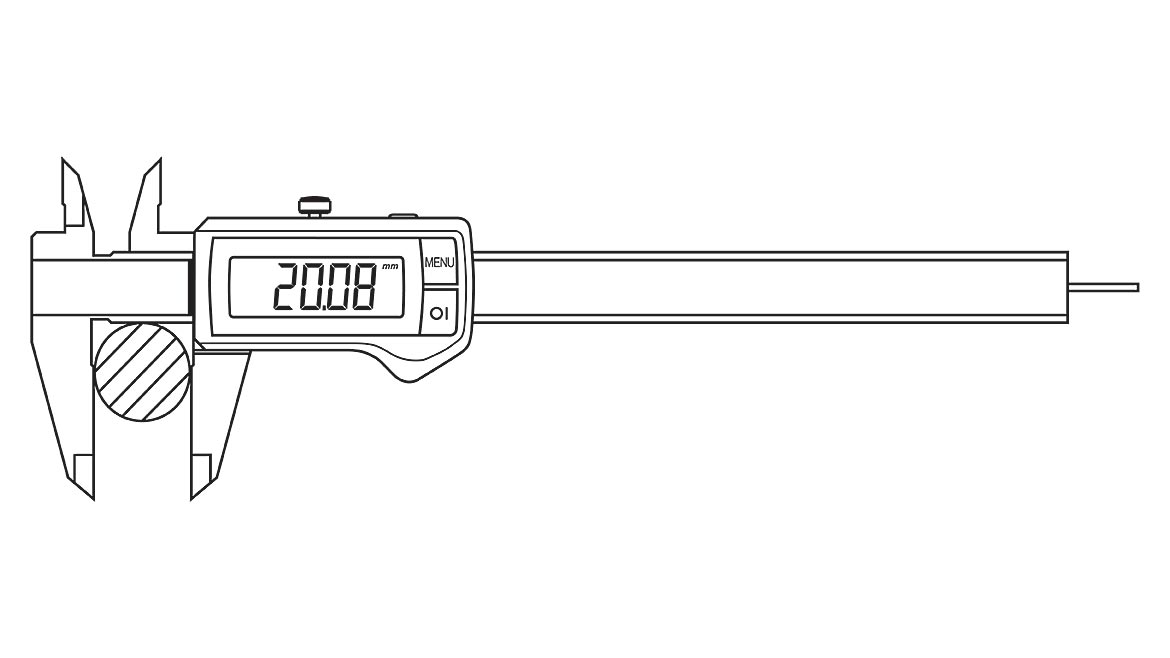
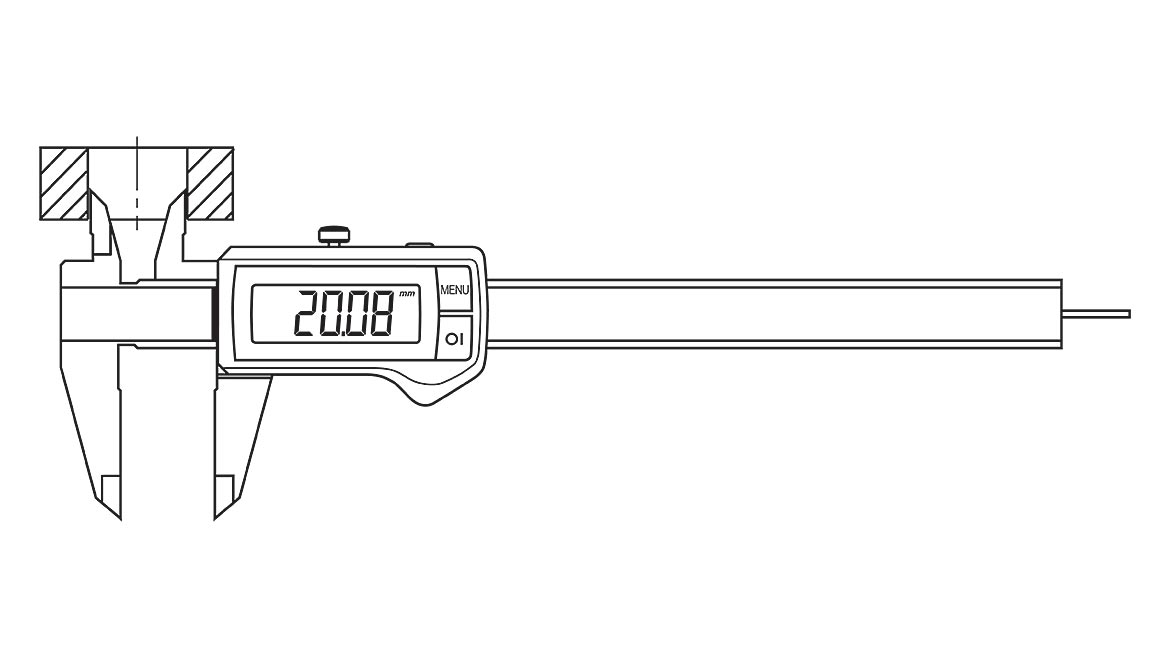
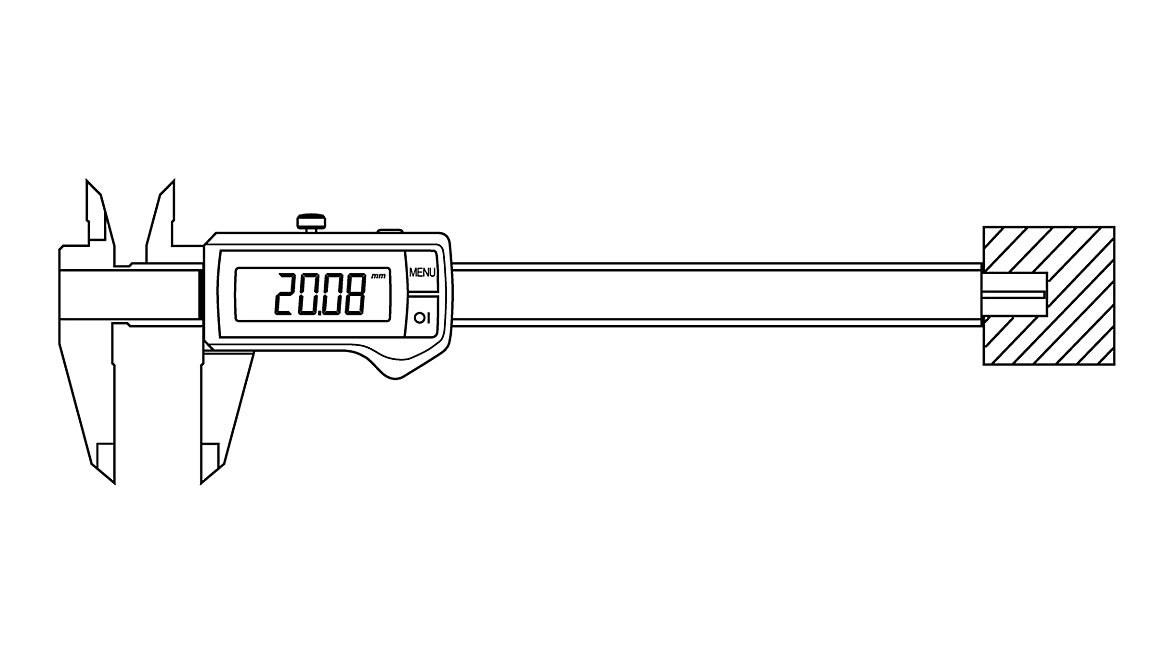
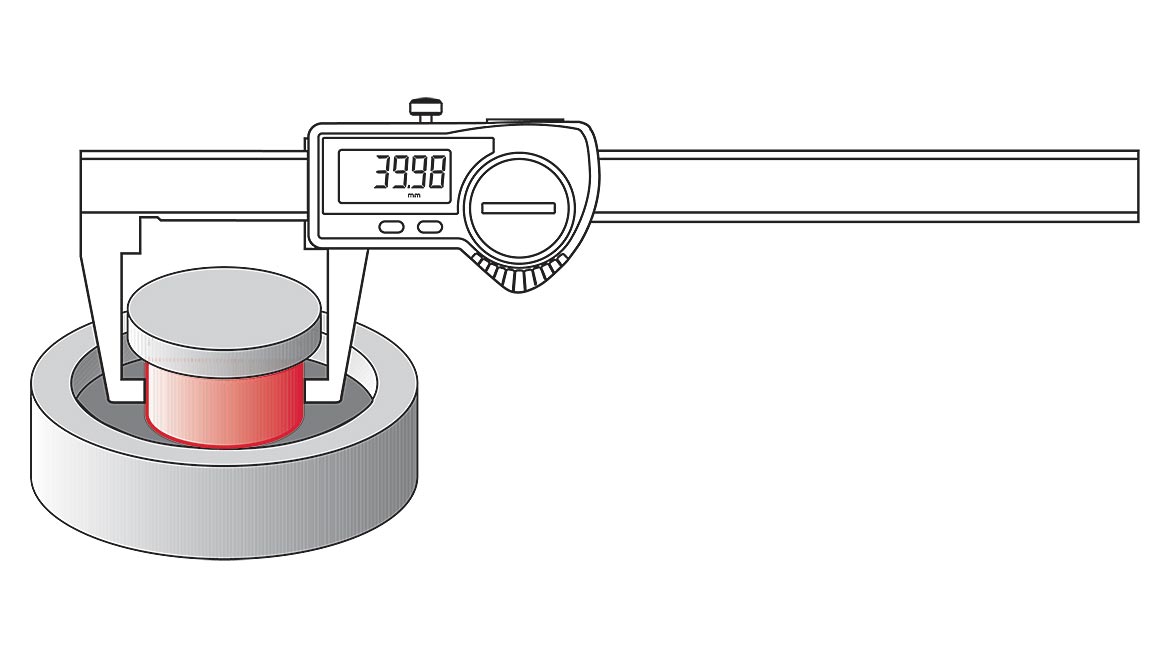
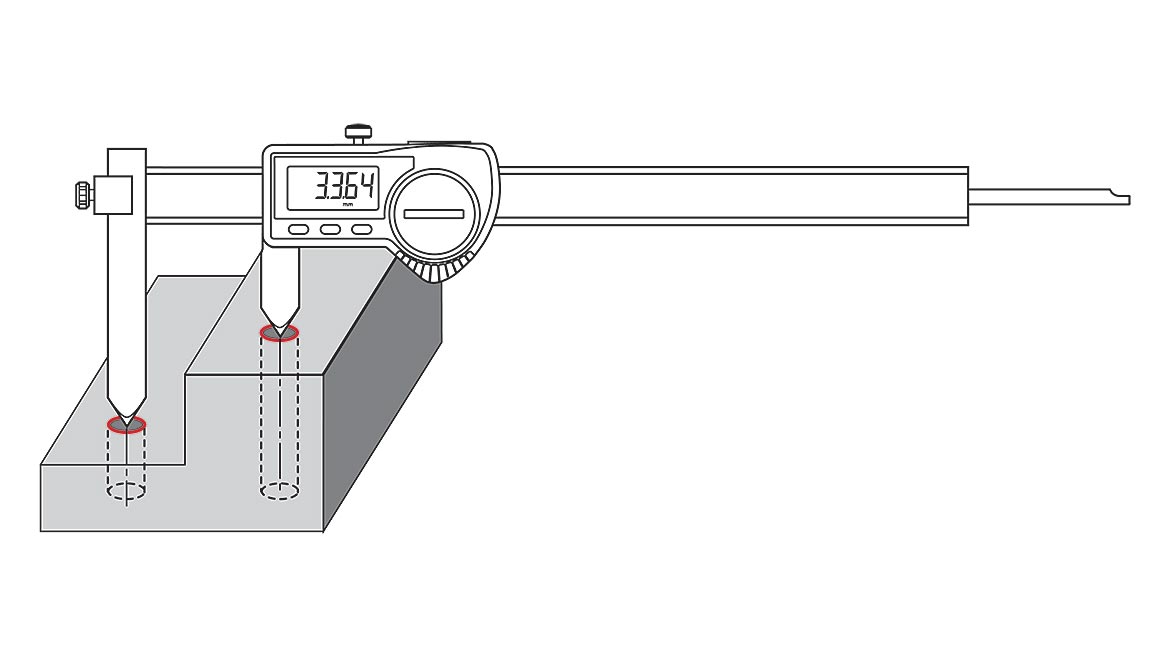
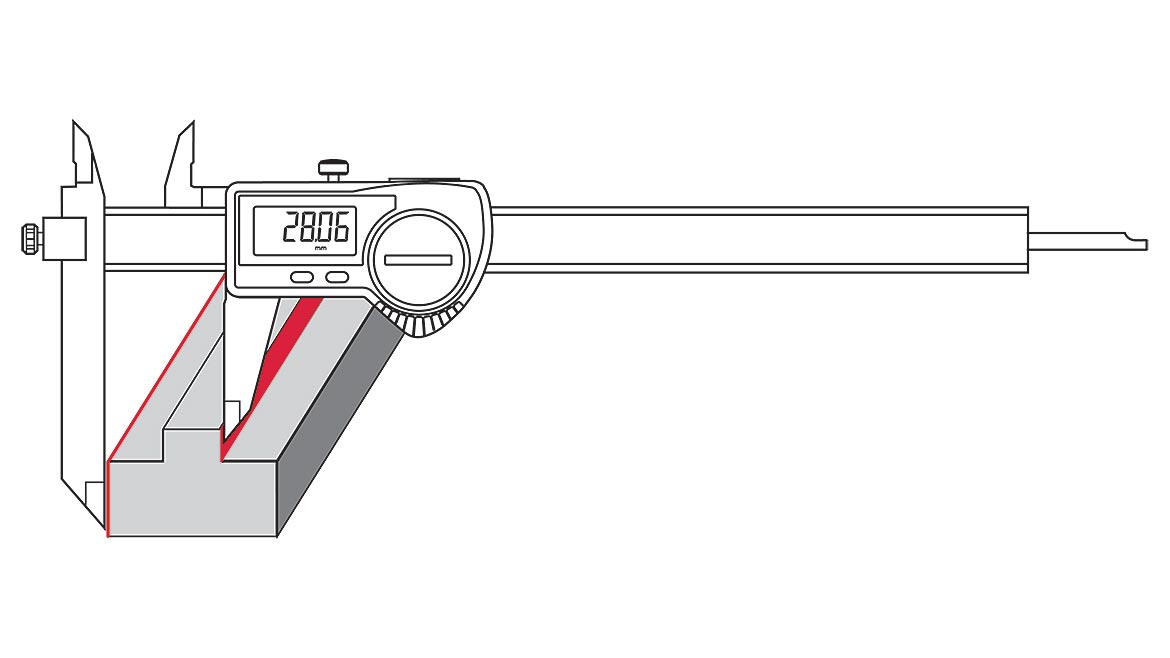
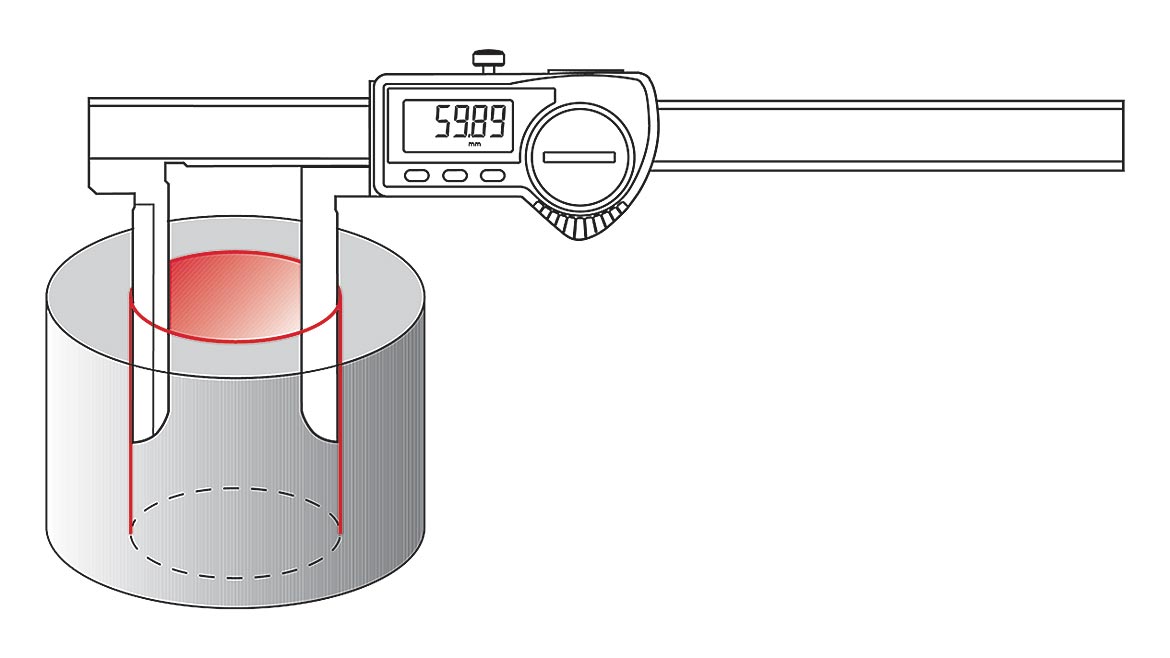
As shown in figures 1–4, almost everyone who has ever used a caliper is familiar with the four basic checks the gage is designed to perform: outside, inside, depth, and step.

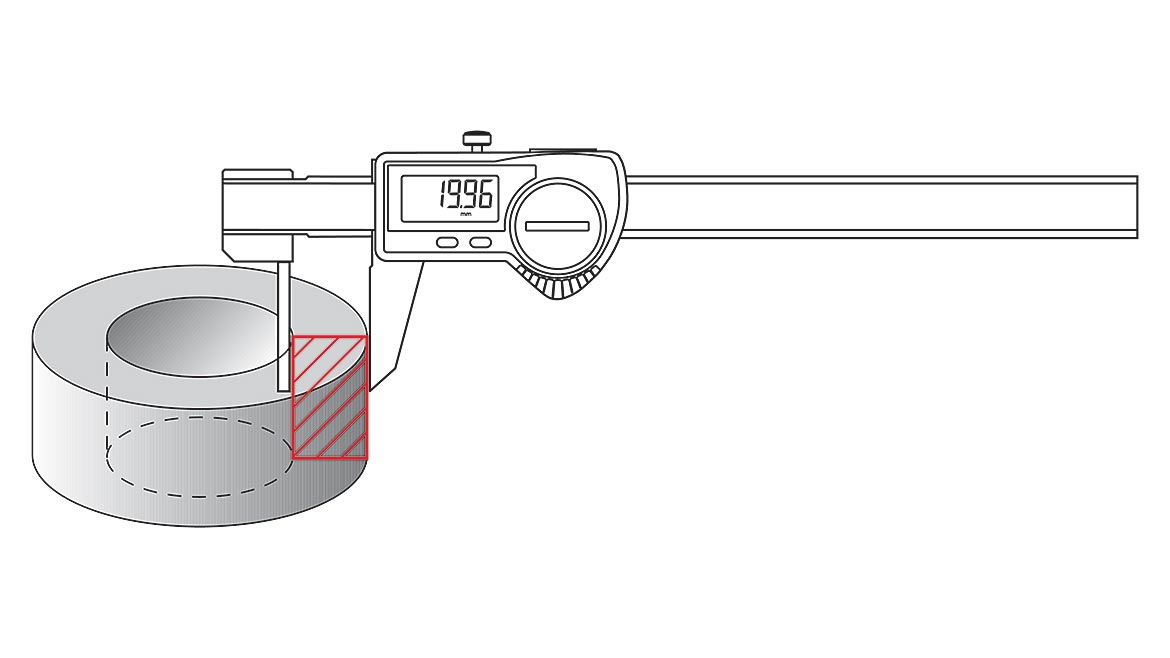
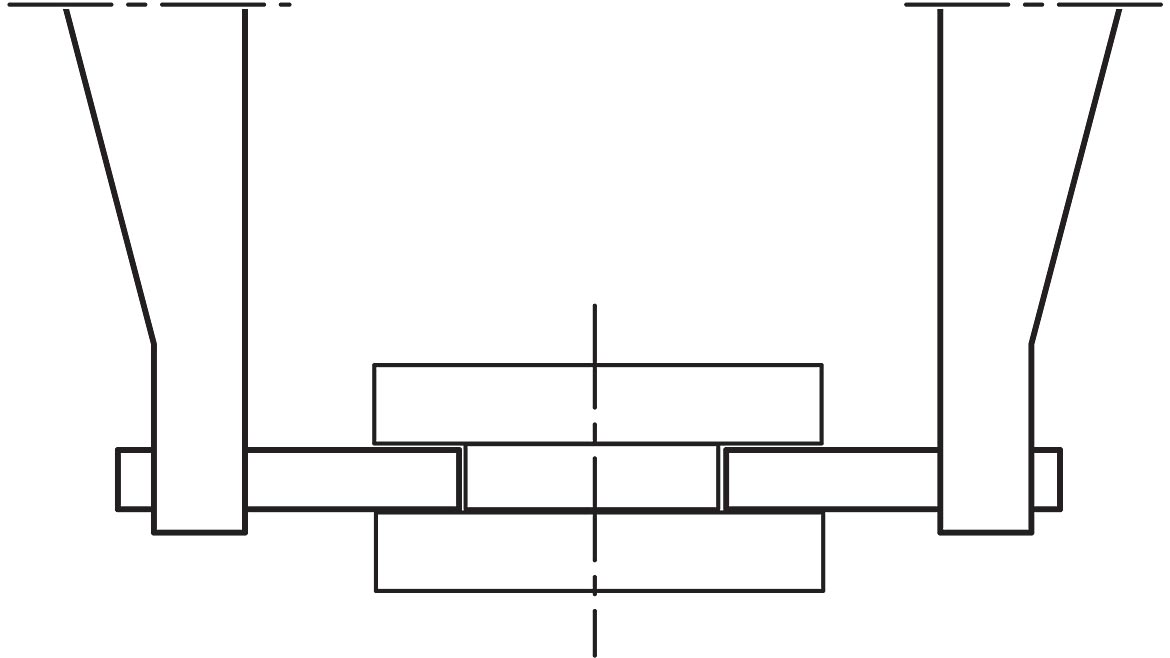
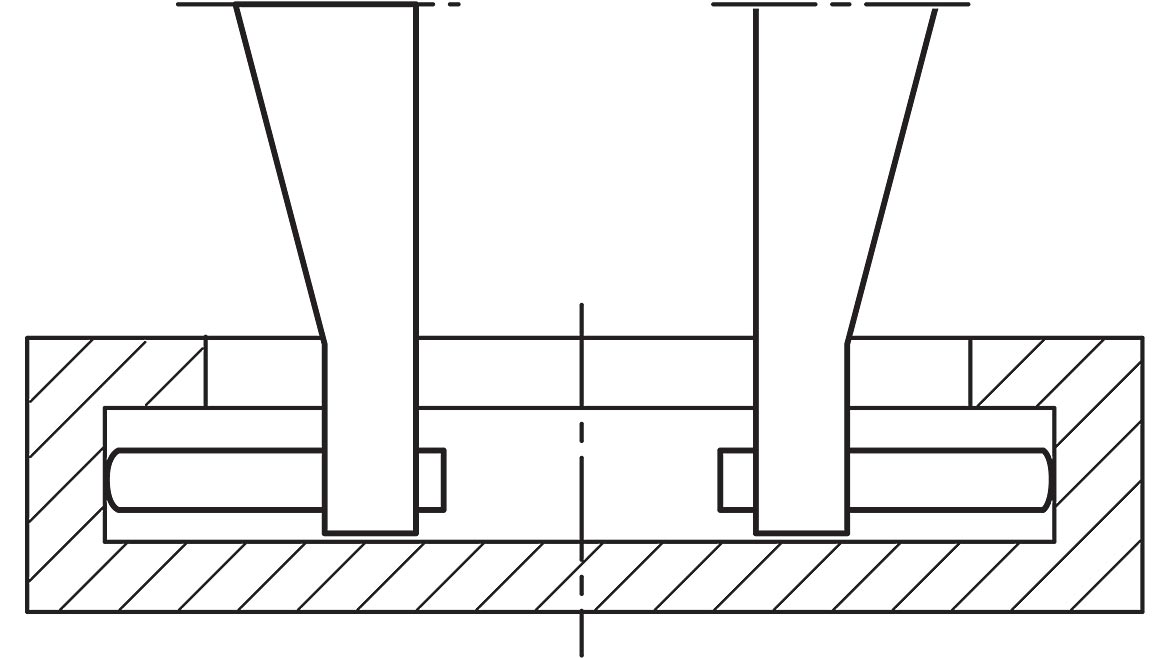
However, digital calipers also can make compound measurements. Since an electronic digital caliper can be zeroed at any point, it can be used to do some of the arithmetic required for calculating the results of a measurement. For example, the following procedure can be used to measure the center distance between two bores of equal diameter:
1) Use the inside jaws to measure the diameter of one of the bores (figure 5). Before removing the caliper from the bore, press the button to zero the caliper while it is set to the diameter of the hole.
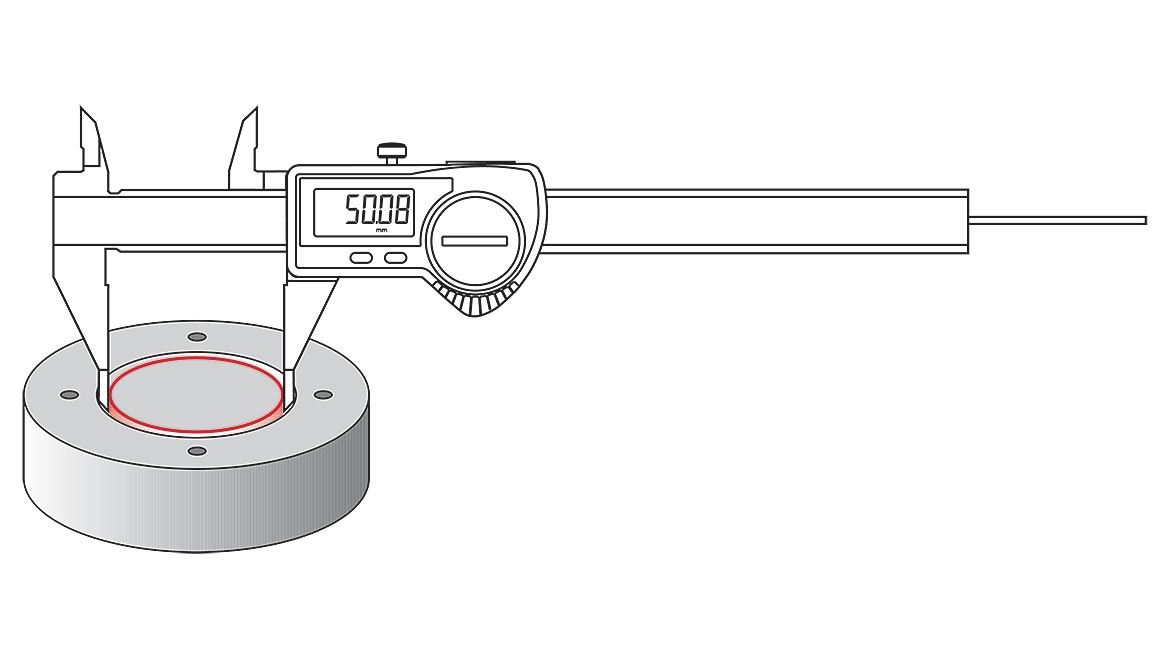
2) Still using the inside jaws, measure the distance between the far surfaces of the two bores (figure 6). The caliper reading will be the distance between the centers of the two bores.
Caliper Styles For Unique Measurement Applications
Beyond the basics, all sorts of caliper styles extend these advantages to many special measurement applications.
A standard caliper consists of two opposing surfaces, a stationary anvil/jaw, and a moveable slide. On most calipers, these are hardened steel, but they can be purchased with optional carbide-tipped or ceramic contact surfaces. This extends the life of the jaws when they are being used to measure abrasive materials in high-volume applications. Furthermore, calipers can be equipped with built-in contact tips with unique forms for measuring special part characteristics or even jaws with replaceable and configurable contact points.
Sample applications for more customized calipers include:
If Walls Could Talk
When measuring or exploring the wall thickness on cylindrical parts, the two flat surfaces of a standard caliper will cause measurement errors since one jaw will measure a chord rather than a line contact. To perform this measurement properly, one of the jaws must be cylindrical. This allows for a line measurement on both the ID and OD of the part for true wall thickness.
In The Groove
Measuring the outside or inside diameter or the width of a machined groove calls for yet another type of caliper contact blade. These grooves can sometimes be so narrow that neither a standard nor reduced face caliper will fit entirely into the groove. Pointed blade contacts, as the name implies, are very slender and flat. They nest readily into narrow-bottomed grooves. Other versions have a configuration that funnels down into a very narrow point for getting into deep groves. These narrow-tipped jaws fit into tiny grooves and tracks, making many previously difficult ID and OD measurements much easier. However, use caution as excessive pressure on these narrow blades—e.g., while the tool is being rocked to find the true diameter—can result in premature wear.
Even More Grooves
But wait—not all grooves are created the same. There are grooves, or recessed IDs and ODs, that a typical caliper cannot get to. Two special jaw configurations are available for these applications, one series for IDs and the other for ODs. The point jaw is ideal for measuring wall thickness, grooves, and recesses, while the flat jaw type is designed for measuring grooves and recesses primarily on ODs.
Getting To The Center Of Things
Calipers with tapered jaw tips are designed to measure center-to-center distances on holes. One of the jaws is often adjustable in height to allow for measuring holes on offset planes.
Speaking Of Offset Planes
Often, parts are not nice and square but have obstructions that need to be measured around. Usually, the standard reference jaw on a caliper can also be adjustable on its height. This allows the main scale jaw to slide up and down to facilitate measurements of stepped sections on the part. Now these hard-to-get dimensions become a piece of cake.
Reaching For It
Knife edge jaws with extra-long reach are designed for those parts that are deeper than the reach of a typical caliper. They allow for deep-hole applications 50% longer than a standard caliper.
The Versatility Of Universal Digital Calipers
At the beginning of this article, we discussed the four basic uses of calipers and checks that can be performed by everyday vernier, dial, or digital calipers—kind of like a run-of-the-mill pocketknife. But have you ever seen those super-duper Swiss Army knives loaded with a host of extra tools such as scissors, ballpoint pens, magnifying glasses—or even with USB sticks? These knives have tools that can do just about anything!
Similarly, a universal digital caliper that employs interchangeable contacts can be designed—making it the true Swiss Army knife of calipers. The universal caliper is more than a standard caliper, as it has the ability to accessorize itself with a host of special contacts to expand its measuring capability. Perhaps the Swiss Caliper of calipers does not have a corkscrew built into it for when you’ve got that special bottle of wine out in the countryside. Still, it can serve many different measurement applications in the inspection area.
For example, the universal digital caliper can mount optional contacts within its standard measuring jaws to increase the tool’s versatility. Got a groove in a part less than 0.080” in width? A standard caliper would have a tough time making this OD measurement, but it is no problem for the universal caliper. Just whip out the special blade contacts, snap them into place, and you’re ready. Have a similar check but on an ID? Well, there’s also an anvil set for that, specially made with a thin blade and radiused tip. Snap these into place, and the ID becomes just another measurement. Even if the groove is less than 0.5mm/0.020” wide and less than 105mm/0.060” deep, it can be measured with the tools in the universal caliper’s bag of accessories.
In a pinch and need to measure some gears or threads? Purpose-built gages for these measurements are very precise and quite costly. But special gaging is hard to justify if you have a unique job, for example, making only a few or a wide variety of gear-like parts with an even number of teeth. Just get the standard accessories for the universal caliper and start making gear checks with the proper ball diameter as called for—quick, easy, and cost-effective. The same goes for thread-checking. Those high-precision measuring kits used on some comparative gages can be adapted to the universal caliper, easily modifying it for that emergency measurement.
Maybe the results won’t be as good as uncorking that special wine, but you may look pretty good to your boss nonetheless.
The Universal caliper looks like any other with ID and OD jaws. What makes it different is the ability to interchange special contacts into the jaw, which significantly expands its capabilities.
Special radiused contacts, specific-size balls, blade anvils, or thread anvils can be used to get into some tight measurement locations.
Like any measurement tool, the universal caliper must be treated with care and respect. Don’t use it for purposes it was never intended (such as prying things apart). Wipe it clean after use; don’t just throw it on the workbench. For dial calipers, be particularly wary of dirt accumulating on the rack, throwing measurements off, and ultimately damaging the indicator. Store a caliper in its case. If it will be there for a while, apply a thin coat of oil to the jaws to inhibit corrosion.
Conclusion
Calipers are very versatile tools, but they are not suitable for every job. As we have noted many times, picking the correct hand tool or gage for the job is critical. As tolerances get tighter and tighter, selecting the proper gage becomes very important. Digital calipers typically read in 0.01mm/0.0005” units. So, if the tolerance is tighter than ±0.050mm/±0.002”, a micrometer (or some other, higher accuracy tool) should be used instead.
Choosing the most appropriate style for the application will enable faster and more accurate measurement. Each type, however, has particular care and use requirements. If you’re going to measure with style, know how to do it properly.
Looking for a reprint of this article?
From high-res PDFs to custom plaques, order your copy today!


