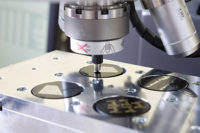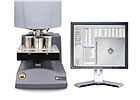
A fully automated traversing and image reading hardness system tests four mounted samples at a time. Source: Wilson Instruments
Hardness testing is a fundamental characteristic in analyzing component properties, and, as an important materials testing tool, this critical parameter can be performed and measured by a multitude of methods and techniques.
While some hardness test types such as the Rockwell test will yield fast, single-process results based on indentation depth, many of the commonly used test types such as Vickers, Knoop and Brinell, require a secondary process to determine the size of the indentation. These secondary processes can be time consuming, inefficient and prone to subjective errors.
One means of improving productivity while providing consistency to the process is through automatic indentation and impression reading utilizing image analysis. Dramatic improvements over the past few years in hardware, electronics, image algorithms and software capabilities have opened the door to extremely precise and reliable testing processes that provide results more quickly than ever before. These techniques are showing great promise raising efficiency, speed and accuracy to levels never achieved before.
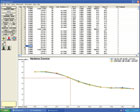
An automatically generated case depth analysis of a gear tooth is shown. Source: Wilson Instruments
Automatic Hardness Testing
Two of the most common hardness tests are Knoop and Vickers, used in micro and macro testing to determine material hardness based on measuring the size of a diamond-shaped impression left from an application of a specified force. The nature of the test typically dictates a relatively light force, resulting in extremely small impressions that must be measured at the micron level.Traditional techniques, still widely practiced today, involve microscopes with objectives of varying resolution integral to the hardness tester, which manually measure through an eyepiece based on human interpretation. Predictably, this is time-consuming, inefficient, and in today’s fast-paced, extreme environment, increasingly unacceptable.
It is not uncommon for a technician to produce and measure by eye many hundreds of indentations during a day, with fatigue likely compromising the measurement process as the indents increase in quantity. Add to this the need to produce a full analysis of a hardness traverse often consisting of more than 15 indents each, usually several times on a single sample, and the need for advanced, automatic techniques becomes evident.
Over the past several years and increasingly in the future, these manual processes have and will continue to rapidly give way to automation in every aspect of the process. New techniques are being developed in material preparation, stage movement, results interpretation and analysis, and even reporting.
One such technology being implemented into many labs around the world is automatic stage traversing and image analysis of Knoop, Vickers and Brinell indentations.
An automatic hardness system typically consists of a fully controllable tester, including an auto-rotating or revolving turret and actuation in the Z axis either from the head/indenter housing or from a spindle-driven system for both applying the indent at a predetermined force as well as for focusing the specimen. Add to this a desktop or laptop computer with dedicated hardness software installed, an automatic XY traversing motorized stage and a USB video camera, and the result is a powerful, fully automatic hardness testing system.
After initial setup with samples and a stored program, it can be left alone to automatically make, measure and report on an almost unlimited number of indentation traverses.
Newer technology eliminates much of the hardware that in the past caused operational challenges and cluttered workspace. For example, the stage is moved through a virtual joystick, and on some systems, stage controllers are integrated into the stage housing. Advances in stage movement algorithms and mechanical design have made XY accuracy and repeatability better than ever, which are paramount in precision traverse requirements such as case depth analysis.
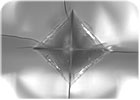
High quality image of Vickers indentation on glass sample were previously not possible with older techniques. Source: Wilson Instruments
Image Analysis
Image analysis is not new, but the technology continues to advance, dramatically improving the process. For example, camera technology has evolved from frame grabber, to IEEE Firewire, to USB, eliminating additional hardware while at the same time increasing camera resolution and field-of-view possibilities.The capabilities of current and developing cameras, coupled with the processing capacity of today’s PCs and continually improving software packages, have significantly improved the accuracy, repeatability and dependability of automatic indentation reading.
All digital cameras have pixel arrays. Each pixel can be either on or off. If a black and white image is projected on the pixel array, the pixels in the dark areas will be off and the light ones will be on. By counting the number off, the size of the dark spot on the image can be determined, and subsequently the image area. The size of any indent is used in combination with the indenter and applied force to determine hardness value.
Automatic Traversing
Expanding productivity even further is the ability to utilize larger size XY stages capable of holding two, four or even six samples at a time in an array of fixturing types.Preprogrammed and saved traverses are opened, samples are aligned in holders, and with a single click, the indentation, reading and reporting of a multitude of traverses on each sample is initiated.
Autofocus mitigates any issues of indent clarity due to Z position variation. Newer software even allows different scales, forces and microscope objectives, within and between traverses.
Automated testing also is increasingly beneficial for Rockwell hardness testing, particularly in repetitive pattern requirements such as Jominy testing, where a number of bars can be fully tested and reported, unmanned after one click of the mouse.
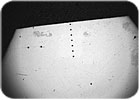
An image of seven indent case traverse on tip of gear tooth is shown. Source: Wilson Instruments
Other Applications
As in Knoop and Vickers testing, Brinell testing by nature is a labor-intensive and manual process that, in its conventional state, requires constant human intervention and processing.Since the traditional Brinell test consists of a single, controlled test force made with a specified diameter tungsten carbide ball, the resulting impression must be optically measured (diameter in millimeters) to determine the material hardness. This is typically performed using a low-power, handheld microscope, a process that is both laborious and subjective. As in Knoop and Vickers, fatigue induced errors from performing measurements repeatedly are common, and the process itself can be inefficient and time-consuming.
With many processes requiring 100% inspection and productivity depending on quick results return, it is no surprise that a means to both accelerate the process as well one that mitigates the possible manually induced errors is in demand. The method that may be most applicable is dependent on a variety of factors including test time requirement, specimen geometry, loading and unloading technique, material properties, ASTM standards requirements and adherence, and of course budgetary alignment.
When using a conventional Brinell floor or bench model tester that performs the indent portion of the test only, an alternative to the handheld manual process involves utilizing a handheld digital camera that can accurately and efficiently measure the diameter of the impression automatically using image analysis techniques. As a result, it has become relatively easy to measure Brinell indents through a camera.
If a handheld imaging system, which requires manual intervention is lacking in the desired production, then a fully automatic, optical Brinell system can provide adherence to ASTM E-10 while allowing for fully automated optical testing.
A fully integrated automatic optical Brinell testing system can quickly and accurately perform the entire Brinell test process in accordance with ASTM E10 including accurate indentation application and providing an image analysis system to autofocus on, identify and record indent size and hardness measurement.
All of this, coupled with flexible software, gives the operator extensive and an abundance of capabilities in generating tests, completing the analysis and generating reports. An operator only has to locate the sample in the tester and press the start button. Indentation is automatic as is the rotation of a revolver or turret style system that turns the measuring objective/microscope into position. The automatic focus and imaging process then is initiated and results are returned in as little as 20 seconds.
Past limitations in regards to surface finish, lighting, preset calibration, as well as pixel sizing have been mitigated, and are continually undergoing improvement. The result is increased ability and dependence on “letting the instrument do the work,” contributing to substantial increases in throughput and consistency, while freeing up the operator for other responsibilities.
With a fully integrated system the labor intensive, subjective and error prone process is virtually eliminated and instead replaced with a significantly more accurate and productive process.Q
