Temperature Effects on Reported Leak Rate
Variances in temperature wreak havoc with the reliability and repeatability of leak testing.
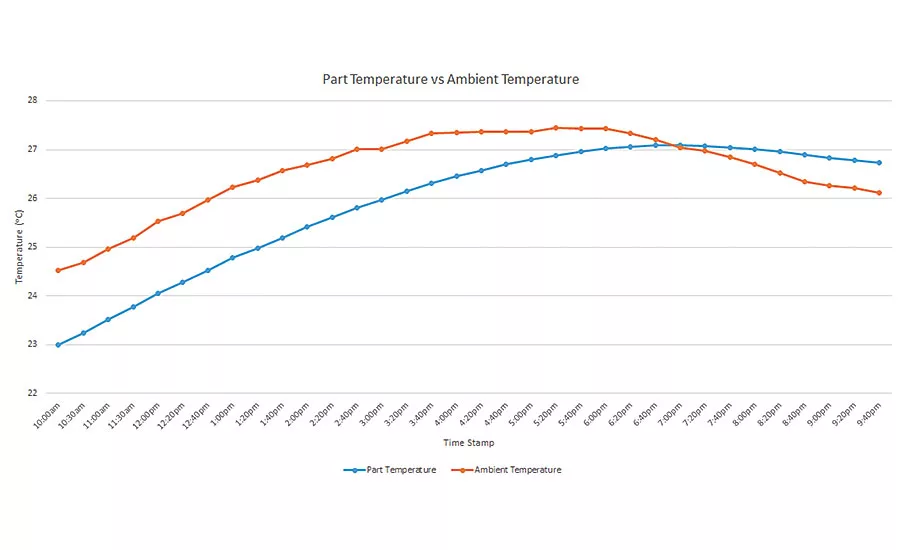
Figure 1: Part temperature vs. Ambient Temperature Source: Sciemetric Instruments
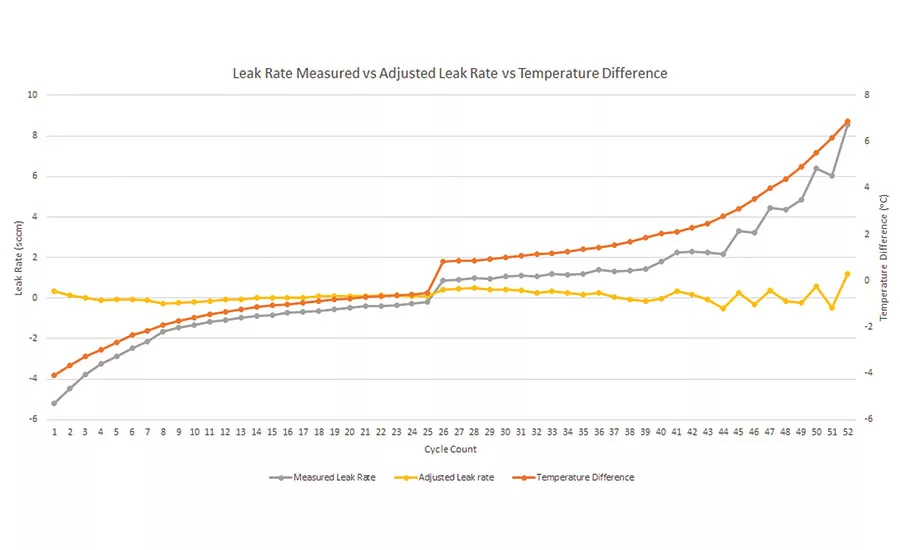
Figure 2: Measured Leak Rate & Adjusted Leak Rate vs. Temperature Difference Source: Sciemetric Instruments
Both spring and fall are challenging times of year for quality test engineers.
In plants that aren’t temperature controlled, the combination of warmer days but still cold nights means trouble with their leak testers. The interiors of cold parts may not warm up as fast as the air in the plant. This may lead leak test equipment to report a lower, and misleading, leak rate throughout the day. The parts in question may roll off the production line without meeting the end customer’s specifications.
It’s an issue for quality test engineers with any number of manufacturers working in the automotive or heavy equipment industries, even the medical supply industry. The parts and products to be tested may vary in size, interior volume, and materials, but the challenge is the same—variances in temperature wreak havoc with the reliability and repeatability of leak testing.
Too many variables for a best guess
With the temperature variations common to spring and fall, the resulting reported leak rate is a negative value that can be significant depending on how cool the night was compared to the afternoon’s warmth.
When leak tests return negative values under these conditions, the obvious conclusion is that the leak testers have been compromised and could pass leaking parts. The quality engineer’s initial reaction is to lower the testers’ leak rate limits to ensure the masters fail the verification test. But this is comparable to throwing darts with a blindfold on; the more the plant warms up, and the more extreme the difference with the night-time temperature, the greater the shift in the leak rate. It’s quite hard to guestimate the adjustment that needs to be made to maintain test quality and accuracy.
It isn’t just seasonal changes. Part washers and cold parts coming from outdoors in the winter are culprits, too. Many studies have been done to understand the effect of temperature on reported leak rate. There is a relationship between the reported leak rate of the part, its temperature, and the ambient temperature of the plant. The ambient temperature, part temperature, part volume, part material, and test pressure are all factors in determining the temperature sensitivity of the leak test.
Figure 1 is an example of how part temperature (blue) and ambient temperature (orange) changes throughout the day and highlights how the part is delayed in warming up compared to the ambient temperature, due to its size and material density.
Figure 2 demonstrates the variance in reported/measured leak rate (grey) that arises when the part is either warmer or colder (orange line) than the ambient temperature. The yellow line indicates the adjusted leak rate results when the temperature variance is accounted for—the result is much more consistent accuracy in the leak test.
What you can do to compensate
Here are some basic steps to help compensate:
Understand all your variables: Temperature is always a factor, but it’s not always the most important one. Consider your processes and the human factor in terms of how the operator performs the test.
How you test also impacts the leak rate results: When you fill a part, you increase the internal temperature due to compression. When you empty the part, it gets cold again. You have to give enough time for the part to stabilize both during the test and before another part is tested. How much time is needed to stabilize? That will depend on the part’s material, the thickness of it, the internal volume, the internal temperature, and the ambient temperature.
That means you need benchmarks: You need to employ controlled tests to accurately document how the part reacts to specific variances in temperature.
Time for a probe: In the perfect world, parts are large enough and production lines are slow enough to manually place temperature probes inside the part for the most accurate reading of internal temperature. In the real world, this isn’t always possible. The next best option is to use a probe with a copper tip in contact with the exterior surface of the part. But be aware that accuracy will suffer, depending on the thickness and type of material in question. Again, controlled testing is key to understand the degree of variation under predictable conditions.
Be careful with your ambient temperature readings: It doesn’t take much to throw off the accuracy of your ambient temperature probe. A door opening and closing, an HVAC system turning on or off, can all cause localized variances in temperature that can be significant. The best approach is to enclose this probe in some kind of housing that will dampen the effects of errant air currents. Also, keep the probe close to the part and at the same height from the floor.
In conclusion
For quality engineers, it’s important to understand the effect of temperature on the reported leak rate and know there are methods to compensate and improve the reliability and repeatability of your leak tester results. By understanding how a specific part reacts to variances from seasonal weather changes, part washers and coming in cold from outdoors, you can arrive at a temperature-compensated leak rate that can be computed automatically each leak test cycle. This will give you an adjusted leak rate that’s closer to the actual leak rate of the part.
Looking for a reprint of this article?
From high-res PDFs to custom plaques, order your copy today!


