Gage R&R studies can help operators from making costly measurement errors
|

|
| Automated measurement systems require nonstandard calculations in gage R&R studies. Source: Mitutoyo America |
It is a fact of nature that all data contain random variation. Part of this variation is due to individual differences, but another part of this variation is due to uncertainty in the measurements caused by variability in the measurement equipment and process. If the measurement uncertainty is too large, the measurement system may be unusable. A gage repeatability and reproducibility (R&R) study looks at this variability.
Gage R&R helps determine the magnitude of the variation in a measurement system as well as the sources of this variation. While the sources of variation can be numerous, three of these sources are fundamental: part-to-part variation, repeatability and reproducibility.

|
|
In this gage performance curve, the red line shows the percent probability of measuring a part in specification. The horizontal axis is the actual reference value for the part. Source: www.statsoft.com |
Part-to-part variation is the normal range over which measurements are made-the part of your data you actually want to measure. Repeatability is the variation because of the gage itself, while reproducibility is the variation because of different operators using the gage. Repeatability and reproducibility together are called "measurement error," or simply "noise," and are measured as "gage R&R." This noise is a nuisance that adds uncertainty to your data. A good measurement system has very low noise, preferably less than 1% of the total variability in your data, indicated as a gage R&R of less than 10%. A questionable system will have noise between 1% and 9% of the total variability, or a gage R&R between 10% and 30%. A poor system will have noise greater than 9% of the total variation, or a gage R&R greater than 30%.
Gage R&R measures the size of the noise relative to the total data variation, which is called % of total variation or %TV, and relative to the specification range, called % of tolerance. It also separates the variability into its sources, namely part-to-part variation, repeatability and reproducibility. This information helps operators determine how to fix a poor measurement system. For instance, a high repeatability relative to reproducibility indicates the need for a better gage. A high reproducibility relative to repeatability indicates the need for better operator training in the use of the gage.
One way of seeing the consequences of measurement noise is to use a gage performance curve. Such a curve shows the probability of accepting a part as in specification using a specific measurement system.

|
|
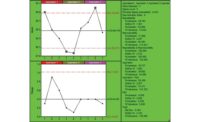
Gage R&R software produces various graphs to help operators understand measurements visually. Source: www.statsoft.com |
In the "Gage Performance Curves" graph on the following page, the red line shows the percent probability of measuring a part in specification. The horizontal axis is the actual, reference value for the part. The graph, showing a good system, indicates that with gage R&R = 7% there is little chance of rejecting a good part or accepting a bad one except very near the specification limits, which are colored in blue. For gage R&R = 14%, a questionable system, the chance of error spreads over a wider range near the specification limits. For gage R&R = 32%, a poor system, errors are more common. These errors can be expensive by providing measurements that are not reliable.
Gage R&R helps determine if a measurement system is adequate for your needs. The study also helps determine what needs to be fixed if the system is poor, tells the operator if the measurement system is trustworthy or if he needs a better system and, ultimately, saves the operator from making costly errors.
William D. Kappele is president of MathOptions Inc., Bellingham, WA. He teaches Design of Experiments and gage R&R classes worldwide. He may be contacted through www.ObjectiveDOE.com. John Raffaldi is a test engineer at Micro Encoder Inc., Kirkland, WA.

