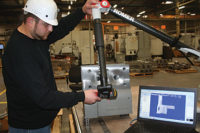
The company provides prototyping, modeling and reverse engineering services for a variety of manufacturing markets. Critical to the business is the ability to accurately measure models that are provided by customers and to inspect parts produced by the company's machinists in order to ensure that they are dimensionally accurate.
For these tasks, the company has long used a portable, laser-based coordinate measuring machine (CMM). But limitations of this unit are that it captures data points one at a time, and that the operator must manually move the steering system to track each point to be measured. The time required to perform this task makes it impractical to completely reverse engineer anything beyond relatively simple components and assemblies, says Cris Runge, scanning and reverse engineering manager at the firm.
On one job, for example, Fain Models used the CMM to capture the dimensions of a glass object that was to be duplicated for an aircraft interior, Runge says. It took the operator about 12 hours to generate 650,000 points, he notes. And while that was enough to roughly describe the object's geometry, it still fell short of a full characterization.
Fain Models wanted a more advanced measurement method. The company looked at various scanning options. "After comparing a number of different products, we determined that the ModelMaker W70 from NVision (Coppell, TX) gives us the opportunity to take on more types of work than any of the alternatives," Runge says.
Unlike the company's single point CMM, the ModelMaker relies on a laser stripe sensor that is mounted on a portable CMM. To capture the shape of a part, the user holds the sensor so that a line of laser light appears on the part. The unit lays down a 70 millimeter long band that is 367 points wide, enabling the creation of a highly dense, highly accurate point cloud from which to construct digital surfaces.
The time required to measure complex objects is dramatically reduced. For example, using the NVision unit, a Fain Models technician was able to collect 1.5 million data points in just 30 minutes when measuring the same glass aircraft interior object that required 12 hours to capture 650,000 points using the single-point CMM.
Runge says the added capability provided by the ModelMaker has helped the company land new business. One example is a job recently obtained by the company to build a prototype from a turbine blade model with complex 3-D curved surfaces. The surfaces would have been impossible to duplicate with a single-point CMM, says Runge, but are within the capabilities of the ModelMaker.
NVision Inc.
(972) 745-8444.
www.nvision3d.com

