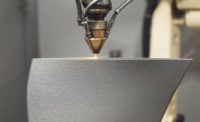
Additive manufacturing (AM) has many advantages when compared to traditional subtractive manufacturing processes for the fabrication of low-volume, high-value, complex-shaped parts. Capitalizing on the benefits of AM can allow performance enhancements, weight reduction, cost reduction, and the decrease in the production time of a commodity. However, quality inspection and control issues must be adequately addressed to enable widespread use.
When approaching and developing an inspection procedure or method, manufacturers need to understand that the techniques used are valid, which involves evaluating design discontinuities or flaws. AM can complicate validation due to product geometry, variance in inherent material behavior compared to legacy manufacturing methods, as well as discontinuity distributions. Given that materials made by AM processes can exhibit novel inherent material properties due to these novel processing techniques, the significance of flaw distributions, geometry, and location require substantial investigation to understand if said flaws will exhibit a significant influence on product performance. All of these factors complicate product inspection and certification. Qualification of AM products addresses these concerns, but can be costly as well as commonly results in very product and application specific understanding only. Further opportunity exists to expand the industry’s understanding so lessons learned from one product design may be applied for multiple part ID’s or various applications and operating conditions.

Source: Getty images
Product material and geometry can significantly affect the probability of detection and inspection procedure costs. Accelerating understanding of these interrelationships and how to leverage inspection technologies (hardware, software, data analytics, and visualization techniques) will aid cost reduction and throughput of components. Overall, there are time-consuming post-inspection steps to inform each design/build iteration that needs to be uncovered and understood. When there is a clearer understanding of product inspectability and validated acceptance criteria, managing costs and readily enabling certification will be more prevalent.
Identifying Interrelationships
The most commonly used inspection technique is X-ray computed tomography, known as X-ray CT. Through X-ray CT, thousands of pictures are taken and combined using computer algorithms to generate a three-dimensional image of a part. The X-ray CT will also show the location and size and shape, discontinuities, and various densities in the material, depending on the technique used. While these data can be vital to product certification, the inspection process duration, inspector level of expertise, and equipment necessary to perform these procedures can diminish the cost benefit of an AM product design.
It’s important to remember that none of these discontinuities may bear any measurable consequences on product performance. Product acceptance is based on the operator’s interpretation as to whether or not the image, with discontinuities, means anything. In general, design encompasses the process used to make a part, its shape, and the material it’s made of. Design and inspection are interrelated, which impacts the ability for manufacturers to readily certify parts. The AM industry in the case of many materials is still developing an understanding of intrinsic material mechanical, corrosion, or wear behavior. A next step is validating debits in performance which arise due to the presence of discontinuities or flaws. Once these quantitative relationships are known and validated, designers may be able to more readily exploit the full range of benefits of AM design—and manufacturers will be empowered to inspect and certify products with validated acceptance criteria. But, understanding the effects of defects can be complex — it can be hard to determine the impact of flaws on product performance, which can depend on the size, shape, and location within the part.
The lack of validated acceptance data can lead to conservatism and overburden the inspection process; driving inspectors to identify smaller flaws which may exhibit negligible consequence on product performance and inflating inspection costs. Product certification criteria conservatism can challenge the physical limits of what modern inspection technologies can also reliably detect given product geometry, material, and surface finishes common to AM components, which can exacerbate inspection costs.
Under the auspices of inspection techniques, there are advanced interrelationships additive manufacturers are trying to understand.
In some instances, designers will simplify the shape’s geometry, so it can be more readily inspected by other technologies that lower costs compared to X-ray CT. Doing so is a significant trade-off, as this often contributes to less optimal economic outcomes.
Given this interrelationship, it is essential to use advanced technologies to examine the full order of operations or product value stream. There are also analogies and factors to consider for the current inspection techniques still used today:
X-Rays: When X-rays are fired at a part, some of those rays are absorbed, and some are scattered — this is related due to the shape and the state of the material. Manufacturers use this type of technique because AM processes produce material at much finer length scales compared to more common manufacturing methods. Hence, there is often a need for volumetic inspection as processing conditions may substantially vary in different features or at different times and so material and performance may substantially vary from location to location. Therefore, X-ray CT offers a means of characterizing the three-dimensional physical state of additively manufactured materials.
Ultrasonic Testing: A known legacy method, ultrasonic testing hinges “good coupling.” Good coupling can be understood as contact and transmission of energy between the product and an emitter, wherein an ultrasonic wave is pushed out into the part, and the sound that bounces back and is subsequently detected. Ultrasonic inspection offers a view on the shifts in the part’s timing by benchmarking the speed of sound, which can aid detection of discontinuities. In the absence of good coupling (in the case which product surface roughness is relatively high), ultrasonic inspection data interpretation can become complicated and readily detecting variation within the material which allows for certification can be substantially complicated (time consuming and challenging to accurately interpret). Furthermore, complex surface geometry can limit an inspector’s ability to maintain continuous and favorable contact (good coupling) between the emitter and product.

Source: Getty images
The industry continues to explore ways to readily and effectively inspect AM products cost effectively and quickly for these reasons.
Manufacturers inspect so that parts can be certified, and establish limits to understand how to interpret the derived data is equally as crucial as the inspection technique itself. X-ray CT is a preferred method because it has the ability to uncover the subsurface geometry of a part, providing manufacturers with an opportunity to create complex components and observe subsurface features to assess the part’s density or how it’s sounded correctly. In layman’s terms, is the part solid or Swiss cheese, and why does that matter? X-ray CT can help figure that out.
Design for Inspectability
When parts are designed, manufacturers should consider how they will be inspected. Designers should be familiar with the capabilities and limitations of inspection technologies—including how design complicates inspectability and how inspection can diminish the business case of an AM design. There is opportunity for further tool (software, testing, techniques) development as well as validation and experimentation which can further the industry’s understanding of design for inspectability.
The marriage of fundamental understandings of the capabilities of various inspection technologies and designers’ understandings is evolving. If joined, it would help ensure that the designed products can be readily certified through “common” inspection technologies. In many instances, AM products can be readily certified, but it is when more critical products demand rigorous inspection that this consideration should be noted.
These parts need to be certified and safe to use across various industries. Understanding the formation of design and inspection anomalies within materials is critical to advancing analysis and model-based qualification methods.
Leveraging Materials the Right Way
Industries are trying to understand how to leverage additive manufacturing in a variety of materials used today. Materials include polymers, composites, ceramics and metals. Because all these materials differ in density and homogeneity in their microstructures, they can easily shore up false positives or cause inspectors to struggle to see actual discontinuities in the material due to inherent complexities.
For instance, X-ray CT may struggle with high-density materials like refractory metals that manufacturers want to use more. Tungsten alloys can serve as an example, where X-ray CT may not readily provide the necessary probability of detection. These materials and designs require further development.
In other words, some people put spices on their food to increase the flavor — but what if that actually created a severe problem? Those problems are costly, timely and could be better mitigated if the design materials are better understood and along with the design technology itself.
From a business standpoint, industries are trying to inspect smarter, which requires thoughtful consideration of the above scenarios. Inspectors, manufacturers, and makers are trying to understand the science and technology behind inspection processes and the computer algorithms and approaches from other industries, on how to accelerate the pace to inspect more parts. This is all done to decrease costs and allow for additive manufacturing to become a more competitive technology.
Through thoughtful inspections, additive manufacturing and technologies in the industry will become more competitive and readily available for a variety of usages. Certifications will become more cost effective, and additive manufacturing technologies will unleash even more capabilities.
Brandon D. Ribic, Ph.D. is the technology director of America Makes.


