Vision & Sensors | Machine Vision 101
Key Considerations When Selecting a Machine Vision Lens
There are 10+ considerations. Understand each and how they impact application performance.
Improper selection of a machine vision lens can make your camera selection ineffective – or severely under-performant. Customers sometimes initially select lenses based on budget or size without understanding the impact to the imaging system.
Besides the camera’s imaging sensor and the lighting, the lens is a huge determinant of machine vision outcomes, so it’s important to understand enough about lens selection to make an informed decision.
In this article we survey key considerations when making a lens selection. Of course, your lensing professional will be happy to advise – but they’ll ask you some of these questions anyway, so it’s helpful to make notes relative to your planned application.
Key Considerations
The considerations below are not sequenced in any particular order of importance. Some are always relevant, regardless of other factors. Matching imager size to sensor is always relevant. Some may not always be relevant – but it’s best to verify that to avoid pitfalls. For example, if vibration is a factor, a set screw to retain lens settings could be critical.
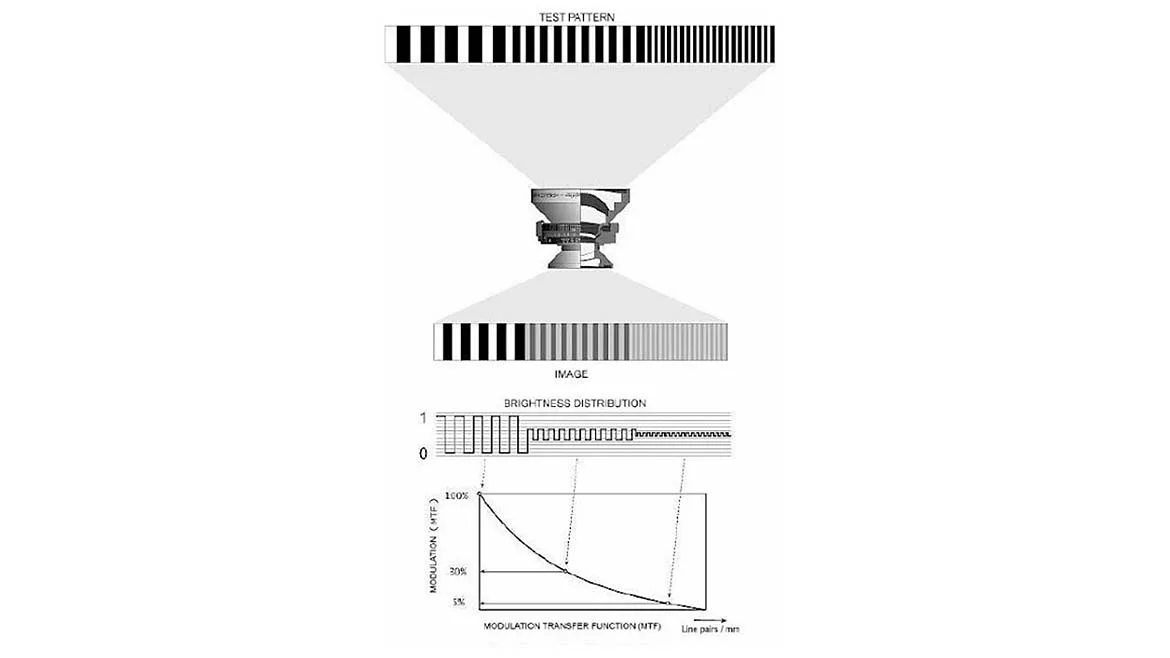
Contrast
The ability to optimize contrast is very important. Machine vision is about automating the visual identification of features. Whether it’s presence-absence detection for a single object, counting multiple objects, or the location of objects to support movement – the system must detect detail. That comes down to edge detection, or contrast between gray levels in a monochrome application. Or transitions between color tones in a color application.
An important measure of lens performance is provided by the Modular Transfer Function, or MTF. It’s particularly useful when comparing lenses from different manufacturers – or even lenses from different product families by the same manufacturer.
MTF deserves a document – with texts and images – all to itself. See the knowledge base referenced at the end of the article – or speak with your lensing professional.
Object Size And Field Of View (FOV)
The field of view (FOV) is the “scene” in which the application will identify, measure, count, or otherwise evaluate the target object(s). For a highly predictable application, such as inspecting one object at a time that will always be in a defined position and orientation, the FOV need only be slightly larger than the object itself – just enough to create contrast between the background “field” and the target object.
For applications dealing with more uncertainty, such as autonomous vehicle navigation, the field of view must be large enough to identify stationary and moving hazards, such that processing time, successive images, and vehicle steering, acceleration, and braking insure safe outcomes. In such an application, the FOV may be very large indeed, compared to the size of objects that must be identified.
The angle of view is often a requirement with the broad “infinite” distances needed for autonomous vehicle navigation.
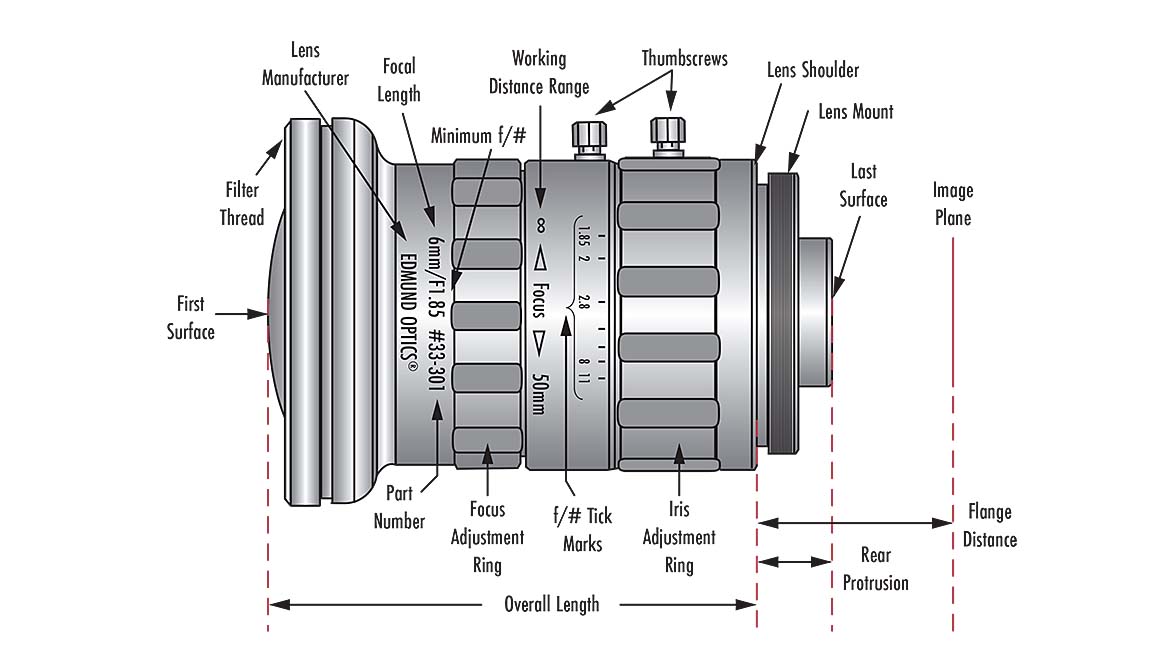
Working Distance (WD)
The distance from the front edge of the lens to the object being imaged is called the working distance (WD). Fixed-focus lenses have a specific working distance that must be maintained to focus the incoming light on the image sensor.
There is a depth of field (DOF) that will be in focus for a nominal distance, with a +/- margin surrounding that distance. And some lenses have adjustable focus. For a fixed-focus lens, the WD can be a minimum object distance (MOD) and can focus to infinity.
Making it real: with your smartphone camera, as you move toward a target, the FOV (and WD) get smaller, and conversely as you move away. A machine vision lens is typically “fixed” for a specific FOV – different lenses are suited to how small the FOV is from what distance.
Every lens designer must work within the constraints of both optical theory and the pragmatics of lens manufacturing, such that any given lens has working distance limitations one must respect. Typically, there are a range of lenses that can be matched with sensors, to accommodate diverse application requirements.
Think about your preferred camera deployment position but be prepared to adapt to the practicalities of what is on the market. Custom optical designs may be possible, but that’s expensive. Usually one can find lenses suitable to the task, as sensor, camera, lens, and lighting markets evolve together.
Resolution
To visually identify an object, one needs contrast between the object itself and the field or background. Let’s keep it simple for now and presume that we’re looking for a single object that will contrast clearly against the background, without the complexity of multiple objects partly occluding each other.
The sensor array defines the maximum resolution. In essence, the more pixels the higher the level of detail, assuming one gets the optical geometry correct in mapping the field of view onto the sensor.
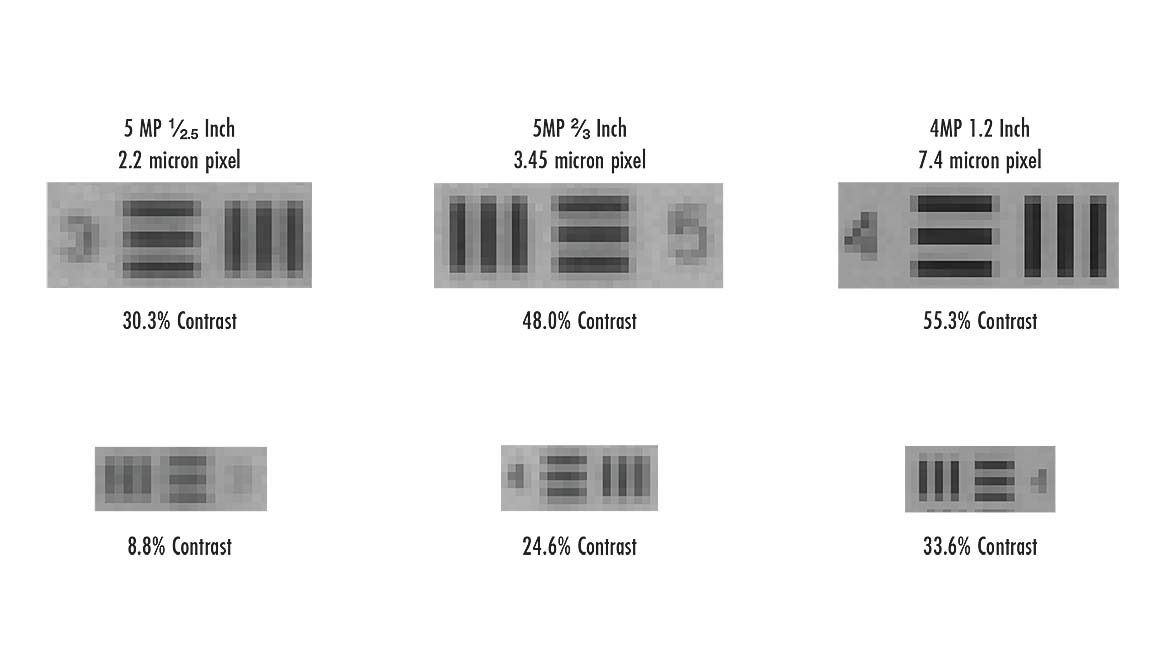
A key guideline is that each minimal real-world feature to be detected should appear in a 3×3 pixel grid in the image. You can determine your resolution through some math which would define what a pixel should represent in object space, e.g. 1 pixel = 0.5mm.
Imager Size And Sensor
Sensors are typically rectangular in shape, while lenses are round. In both cases it is due to the pragmatics of engineering design, production costs, physics, and performance. Matching a lens to a sensor may sound a bit like putting a square peg in a round hole!
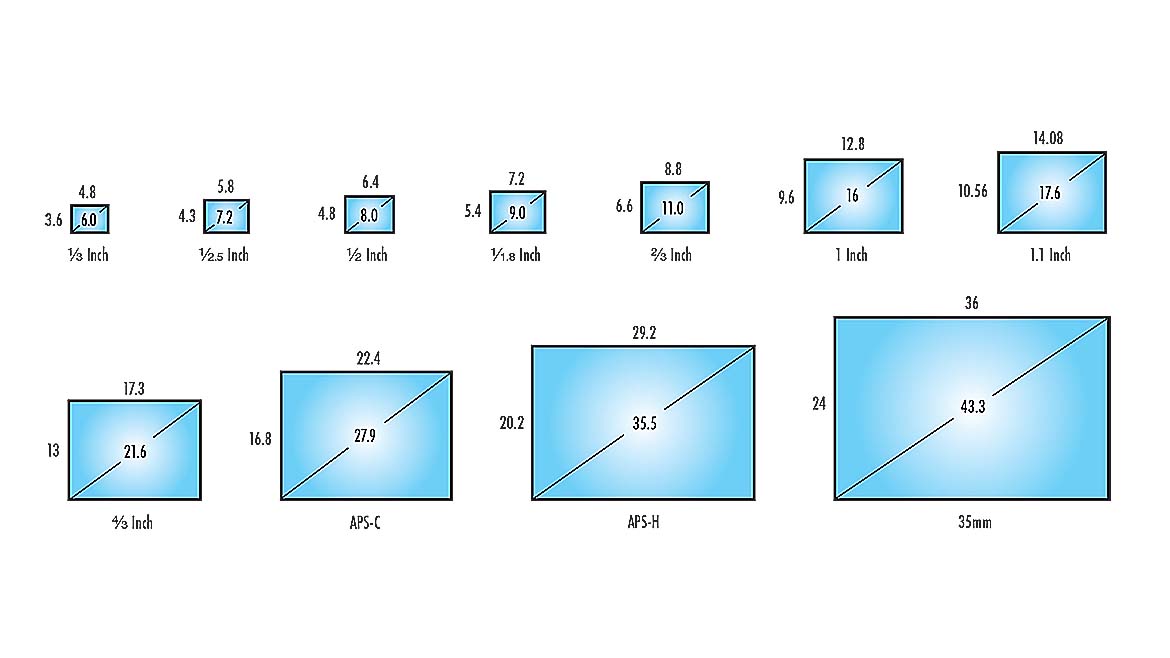
In fact, it’s being sure the round cone of light fully reaches the corners of the rectangle, as it would be a shame to pay for the whole sensor and fail to utilize all the available pixels. So, the lens has to fully cover the sensor – it can be “just right” or “too big” – but should not be “too small.”
While it’s okay if the image is bigger than the sensor, ideally it’s not a lot bigger or you’ll have paid for more glass and a larger and heavier lens than would be optimal, if a smaller option is available.
That said, sensors are trending larger over time (despite more densely packed pixels), and there are both cost and simplicity benefits to processing a single large image compared to “stitching” two or three images from adjacent cameras and lenses. Whatever your application’s ultimate design, the lens MUST be matched carefully to the sensor.
Wavelength
Many machine vision applications operate in the (human-) visible light spectrum, from approximately 380 – 700nm. So, there are a corresponding wealth of sensors, lenses, and optical filters that are sensitive to those wavelengths and that either block or are non-responsive to other wavelengths.
But some of the most innovative and effective machine vision applications operate in the non-visible spectra, including ultra-violet (UV), near infrared (NIR), and infrared (IR). Within infrared there are even distinctions among short wave infrared (SWIR), mid-wave (MWIR) and long-wave (LWIR).
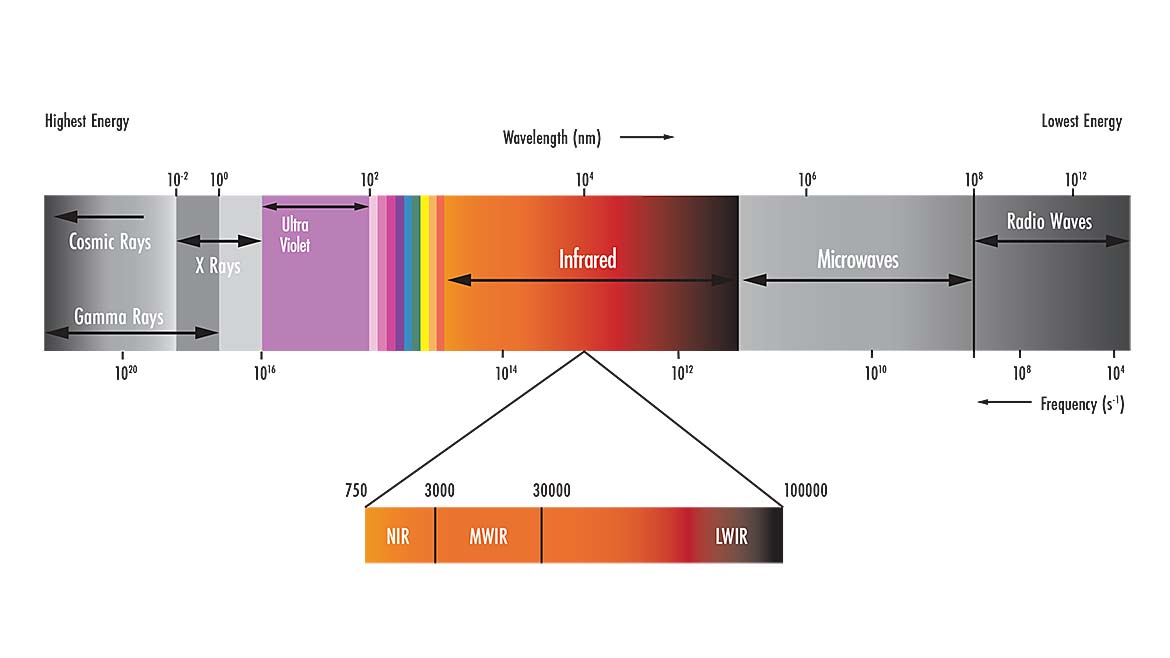
Conventional (visible light) lenses might be ineffective for applications in other spectral ranges, so there are lenses designed specifically to perform well in certain UV and IR ranges. There are also “combo” lenses that can work in visible and IR, for example. Make sure you choose a lens whose design and performance is well-suited to the camera sensor and application requirements.
Aperture
Just like the pupil of a human eye, a narrow iris creates a small aperture through which the light can pass into the lens internals. A wider iris admits more light through a larger aperture.
One way to control exposure, with a given aperture setting, is time. If 0.25 second exposure is too dark, try 0.5, 0.75 seconds, and so on until the desired saturation is achieved. That can work great if the target and camera are stationary. And if the number of cycles needed per minute or per hour aren’t too ambitious.
But if motion is involved, or if shorter cycle times are preferred, lengthening exposure times is thankfully not the only option. In particular, one can open the aperture wider to admit more light. That can hold the exposure duration short, playing these two controls against each other to the widest possible aperture allowing the shortest possible exposure.
But not all lenses offer a wide aperture such as f/1.4, some offering a maximum of f/4, so opening the aperture further may not be an option with certain lenses. But adding more light may be possible unless constrained to natural light. Or choose a more sensitive sensor.
Camera (Lens) Mount
Most machine vision cameras provide one or more standard lens mounts, so that the same camera may be used for diverse applications – whether by the same user or across thousands of users with differing requirements.
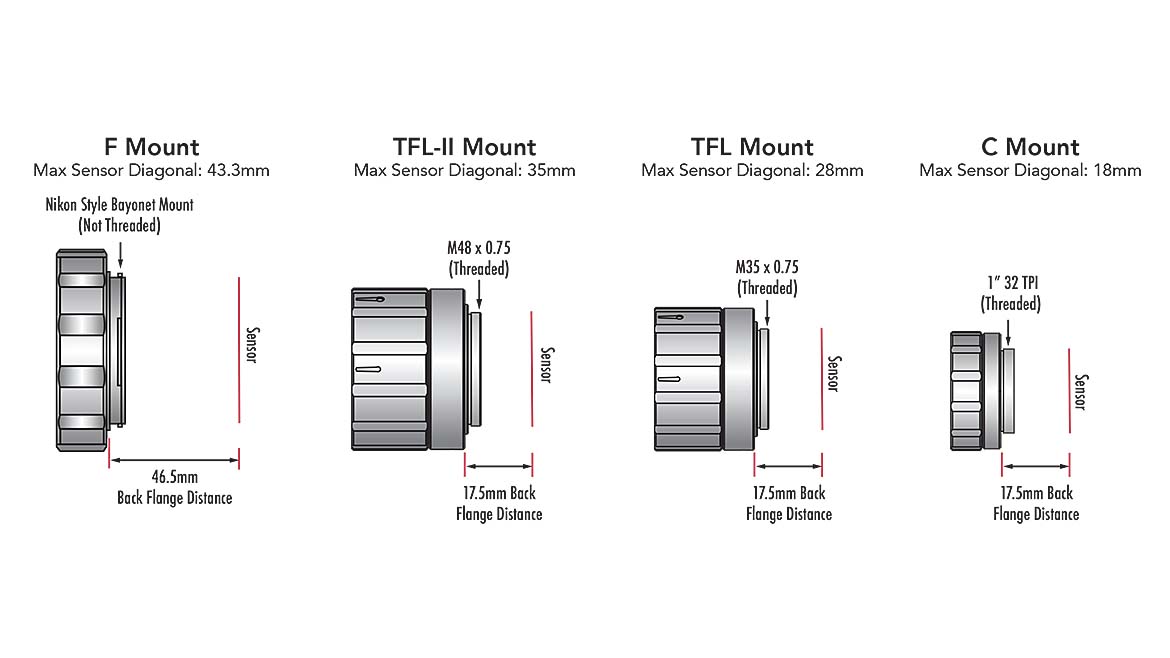
Popular lens mounts include M42, CS, C, and F, but there are others as well. The different mounts specify specific diameter openings, thread pitches, distance from the mount to the sensor surface, etc. Certain mounts are better for different purposes, larger diameter mounts for bigger sensors, or better alignment. In machine vision, optical alignment of the lens to sensor on larger more expensive sensors is more critical, and threaded mounts provide better lens to sensor/camera alignment and mounting compared to bayonet mechanical mounts.
Lenses can be manufactured with varying levels of quality, including plastic housing to even molded plastic lenses. A lens might have fixed or adjustable focus. A set screw could be provided to lock down a focus or aperture control ring. Resolving power of the lens might be excellent, good, or merely good enough (for a non-demanding application).
Summary
As you can see, lens selection is a complex topic, and we’ve only had space here for a modest depth across key topics. For more information see articles, guides, and calculators in the 1stVision.com knowledge base. Or speak with your lensing professional.
Looking for a reprint of this article?
From high-res PDFs to custom plaques, order your copy today!


