All practical dimensional metrology applications rely on capturing data points in space, xyz coordinates. Once you have the measured data relative to a virtual or physical part there is a myriad of things you can accomplish with software, whether it be in quality control, assembly or reverse engineering. Currently, there are many contact and non-contact measurement systems available for gathering data points, therefore evaluating the measurement requirements will guide you in making a decision on the correct tool for your application. Laser trackers are an excellent choice as a digital metrology device, especially if you are dealing with large scale applications or parts found in aerospace, ship building, automotive and other manufacturing industries that require high accuracy.
 
Laser trackers are portable, robust, accurate and precise measurement devices capable of measuring over long distances (150+ feet) in a variety of manufacturing environments. While a mainstay in tooling shops for fabrication and inspection, they are also being widely used in automated manufacturing applications where speed and accuracy are required. 
 

Laser Tracker Basics

Laser trackers can measure small and medium size parts with high accuracy, 25 microns (0.001 inch) at five meters. But where laser trackers really shine is accurately measuring large assemblies with measuring points up to 70 meters apart. Trackers are not new; the first device was introduced more than 20 years ago. Their use and flexibility has evolved over the years with software and computer processing capabilities, but the basic principles are still the same. A laser tracker measures coordinates by sending out a highly stable laser light wave at a consistent frequency. The light is reflected off a target, typically a spherically mounted reflector, or SMR, and returns on a parallel path back to the tracker head. Back inside the tracker a highly accurate distance measurement device, typically an interferometer or absolute distance meter, calculates the distance measurement to the target based on the returning light waves, while precise angle encoders measure the horizontal and vertical angles. In a typical measurement scenario, the operator will place the SMR in the trackers known home position, which will reset the interferometer. Once the SMR is removed from the home position the tracker will focus on the center of the SMR calculating distance in real time. As long as the beam is not interrupted the laser will continue to track and report coordinates. The accuracy and speed of laser trackers separate them from other portable coordinate measuring devices, especially in large scale manufacturing. The measurement working range of laser trackers make them ideal devices for medium to large parts as well as the ability to perform measurements without relocating the device. This typically increases the accuracy of any measurement process. 
 

User-Based Innovation

The users of metrology devices and the software that drives them continue to develop new and unique applied processes for laser trackers. When an organization already uses other types of portable devices a common software platform should be considered; one that will drive all your digital metrology devices, regardless of the type or brand being used. This allows measurement specialists to choose the right point-gathering device for the job and share data universally. The benefits of this are a reduction in training, improved productivity and most importantly, continuity throughout the manufacturing environment. Once engineers have a means to capture good data and the software to manipulate it, watch out!
 

Laser Trackers in Action

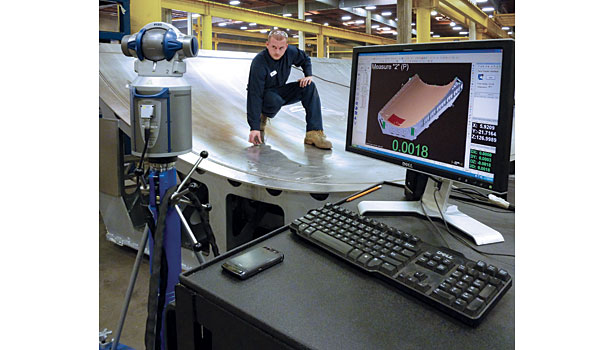
Coast Composites Inc. is an aerospace job shop dedicated to producing large precision molds used by aircraft and other manufacturers for production of composite components. Some of the high-precision tooling they produce for customers is extremely large, including the wing mold for the Boeing 787, which are 108-feet long. In spite of the size of the molds it produces, there is no lessening of the tolerances Coast must meet to satisfy their customers’ specifications. Fine finishes and tolerances of 0.004 inch to 0.005 inch over extreme lengths are common and like any other quality control requirement, they have to be able to prove to the customers that they have met or exceeded their specifications. Originally, the company did most of its quality control using probes on their mills, but that tied up the machines and was extremely time consuming, especially if the part had to be put back on the machine just for quality control. A better choice for doing QC turned out to be the use of portable CMMs. In the case of Coast, the parts are so big it makes more sense to bring the CMM to the part. Laser trackers have been adopted for their portability, speed and their accuracy over very long distances. For most aerospace projects, Coast receives a solid model of the component mold to be fabricated, included with the model are all the critical dimensions and inspection points. For quality assurance purposes, the model is imported into metrology software where an inspection routine is then set up and executed based on a virtual alignment between the CAD model and the physical part. Using laser trackers, a single measurement technician is able to complete the inspection routine; this is done by placing the SMR at each measurement point and triggering the measurement with a remote pendant or using automated triggering settings.
 

SpaceX, Falcon 9 Assembly

The accuracy of every SpaceX mission is dependent on careful alignment of the Falcon 9’s sections and precise launch vector positioning. The Falcon 9 is 180 feet tall and has a 12-foot diameter with the final assembly being completed at the launch site. To position and align the Falcon 9’s components, SpaceX uses laser trackers and Verisurf BUILD software, which is a virtual gage. Laser trackers feed measurement data directly to Verisurf, which reports, in real time, the accuracy of each section relative to the CAD model. To follow its intended flight path, launch specifications allow the vector of the vehicle to deviate by only 0.02 degrees over the 180-foot length. Again, SpaceX turns to their laser trackers and software to confirm a “ready-to-launch” status. The specs allow the nose to be off of vertical by six inches, this translates to a one-hundredths inch deviation East to West and three-hundredths from North to South, from the ground up, with all sections at their nominal positions.
 

Reverse Engineering for Best Fit

Advanced Integration Technology (AIT) is an industrial automation company specializing in aerospace manufacturing solutions. With the use of laser trackers and Verisurf software they were able to save days, even weeks of machining time on large-scale bond tools. Fuselage and wing skins are large complex surfaces with extreme tolerances. Typically, creating a face sheet that starts out at one inch thickness and is taken down to 0.5-inch will be reduced by less than 0.100 inch with each pass. Because typical CNC processes start with the highest point and work down. In doing this, AIT used to “cut air” for days until the machine finally got down to the uniform layers. Now they use their laser tracker and Verisurf Reverse to create a reverse model that allows them to cut material 100% of the time. This literally saves days and sometimes weeks of cutting 24/7.
 
One of the greatest applied user benefits in metrology today is portability. Taking metrology to the part, in process, is a huge time saver, especially when dealing with large parts or assemblies. Laser trackers are portable and a proven device for collecting accurate coordinate data; when combined with the right metrology software engineers can apply critical thinking with impressive results.
 

TECH TIPS

  • Laser trackers are portable, robust, accurate and precise measurement devices capable of measuring over long distances (150+ feet) in a variety of manufacturing environments.
  • Where laser trackers really shine is accurately measuring large assemblies with measuring points up to 70 meters apart.