New Heights in Height Gages
Today’s multipurpose height gages can perform with near-CMM capabilities.
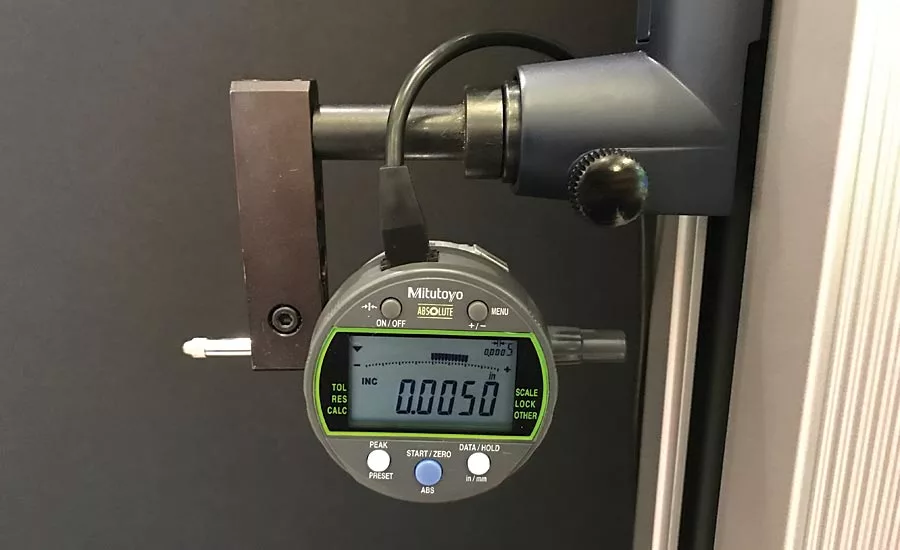
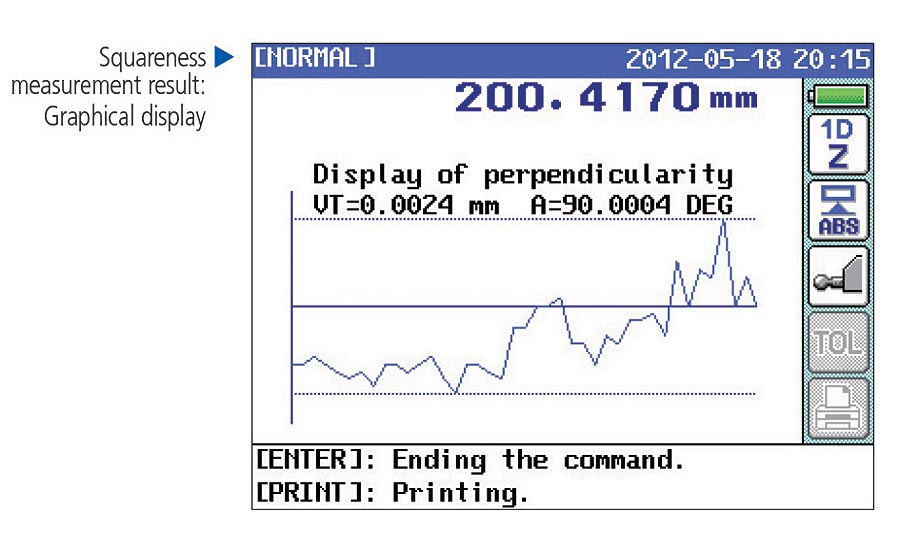
Some height gage models have the capability of inputting the output from linear displacement devices such as indicators. Due to this input, displays are capable of showing straightness, as well as squareness due to the high tolerance squareness specification of the gage.
Whether you’re talking about measurement checks in the quality room or a quick, accurate check on the shop floor, height gages remain one of the most useful tools in metrology today. We all are familiar with the basic measurements taken by a height gage, but many of today’s new instruments can perform with near coordinate measuring machine (CMM) capabilities with similar accuracies to their CMM big brother. There is no replacing the CMM, but having a multipurpose height gage than can perform similar tasks can save a CMM for the more intricate and critical quality checks.
A height gage does exactly as its name indicates—measures height. A slider with a measuring stylus moves relative to a measuring scale on a beam along a single vertical axis nominally perpendicular to a reference plane on the instrument base.
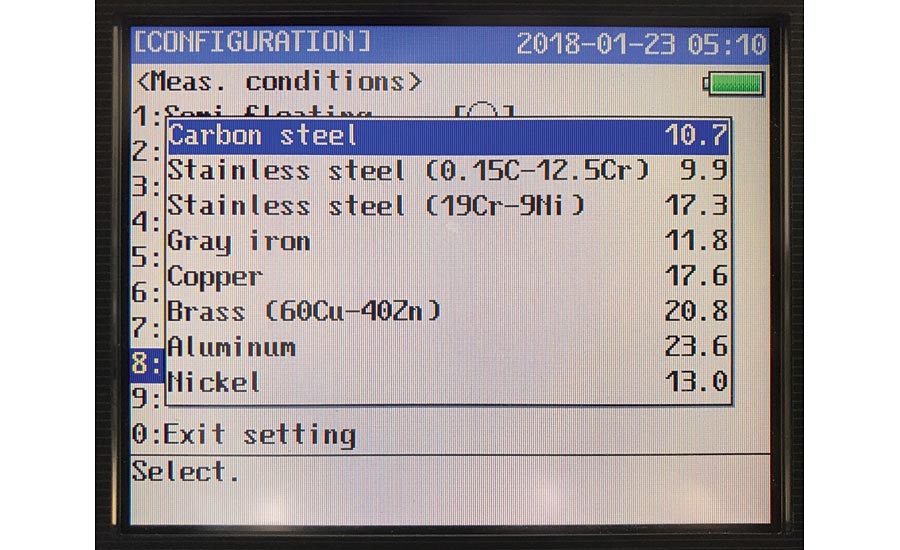
Because many height gages are used on the shop floor, temperature compensation coefficients are automatically input if a material is selected, helping to improve accuracy in harsh conditions.
Height gages are used on a granite surface plate to measure and/or scribe part features from a datum plane. A scriber, test indicator, touch probe or CMM-style probe is used to locate the measured feature. Height gages are a useful instrument for quality control and their capabilities continue to increase.
There are three basic types of height gages: Vernier, dial and digital.
For basic height measurement with the slider, all are good tools, but digital is where most advancements are being made. Improvements include higher resolution and accuracy, temperature compensation, and the capability to measure straightness, squareness, flatness and angles.
Higher Resolution, Accuracy and 2D Measurement
New encoders allow for a higher resolution in today’s gages. Robust construction also increases the potential for higher accuracies, however, as the stability of the gage increases, so too does the weight. Normally, this makes it difficult to slide the gage due to increased friction. To compensate, some units have a pneumatic floating option which allows the entire assembly to float on an air cushion with the push of a button.
Most standard measurement applications use the height, gaps and thickness features. Newer gages can now measure diameters, hole to hole distances, peak measurements from radiused surfaces and most distances between measurement combinations.
Let’s say you have a print that calls for a 2D measurement. Typically, that would require a CMM, but with a height gage 2D measurement feature, you may be able to handle that type of application with a newer high-end digital height gage. The capability of doing diagonal measurements can be done by rotating the part 90 degrees and simply measuring the same points—something only multi-axis units such as CMMs or optical systems could perform before.
Whether you’re talking about measurement checks in the quality room or a quick, accurate check on the shop floor, height gages remain one of the most useful tools in metrology today. While there is no replacing a CMM, today’s height gages can perform with CMM-like capabilities and with similar accuracies.
One application basic height gages have difficulty with is distance between centers. This challenge was overcome when the height gage with calculation power was introduced. This allows the height gage to memorize the highest and lowest point within a sweep. This height gage is still a 2D gage, but peaks and valleys also can be measured or stored and recalled with the push of a button. The ball probe can be interchanged with smaller ones to reach narrow slots. Most height gages with a scriber have been used to measure steps or heights that face upward. Measuring the bottom edge of a slot or groove was not really an option until a ball probe combined with a microprocessor to compensate for the ball diameter was introduced, making the process of measuring distances such as center-to-center quicker and easier.

Typically 2D measurements would require a CMM, but the same measurement can be done with a newer high-end digital height gage. Diagonal measurements can be taken by rotating the part 90 degrees and simply measuring the same points.
Other measurements
Flatness, tolerancing and angles: A horizontal flatness can easily be measured by hitting a flatness button, coming down into contact with a top or bottom surface and then scanning/sliding the part or height gage horizontally.
Easy to read go/no-go tolerancing displays make it less likely for operators to overlook issues. They can be set up as either a direct read value or comparison-type which would be the deviation from zero from a master.
Many quality checks call for angle measurement. With special probes or a horizontal offset, this type of measurement is possible on most new height gages. The part is measured on the height as usual, but then moved horizontally away and the height measured again. The difference in heights is coupled with the offset distance entered to calculate the angle.
Straightness/squareness: Some height gage models have the capability of inputting the output from linear displacement devices such as indicators. Due to this input, displays are capable of showing straightness, as well as squareness due to the high tolerance squareness specification of the gage.
Output and Data
As Industry 4.0 looms, there are more requirements for data output in general and output in different formats. Some data is input directly into spreadsheets or into statistical process control (SPC) software through USB and RS-232C. While the data itself has also become more complete and can include features such as measurements, statistics and time stamps. Statistics can also be auto-calculated and shown on-screen or output to a PC.
Newer gages offer ways to create simple programs which walk an operator through pre-measured points to ensure that the same positions are being measured every time, without overlooking a measurement. This is helpful for inexperienced operators. Because many of these gages are being used on the shop floor, temperature compensation coefficients are automatically input if a material type is selected, helping to improve accuracy in harsher conditions.
Ensure Accuracy
The presence of gage blocks on a granite plate is required to help ensure accuracy. Clean the surface of the granite plates and the bottom of the height gage. Contamination on the contact surfaces will affect the outcome
Before taking measurements, flip the gage on its side so the bottom can be inspected. Use a rubber stone or cera stone to remove burrs, scratches or other deformations. Clean the base with denatured alcohol to remove residue from the stoning process. The surface plate also should be wiped clean to remove any dust oil or other contaminants this could cause the gage to stick to the plate.
To check that the surfaces mate correctly, mount a test indicator to a scriber and bring the indicator to the surface or reference part. Zero the gage and then gently press down on the corners of the part. If the indicator moves, the surface is not level and should be re-stoned until smooth.
A set of gage blocks should always be used to validate all dimensions taken by a height gage. With the gage blocks—the most accurate standard—the height gage no longer measures from the bottom to the top. Instead it serves to transfer and compares the unknown part against a known gage block.
Looking for a reprint of this article?
From high-res PDFs to custom plaques, order your copy today!


