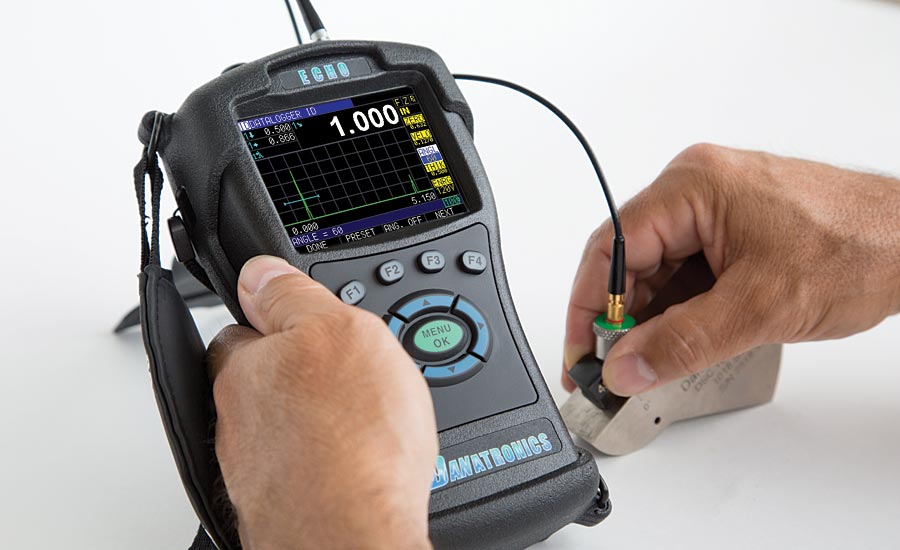
When it comes time to choose the proper ultrasonic thickness gage for your needs, many factors must be considered. Many of the important points are obvious such as budget and your basic application. Other factors may not be, and careful consideration should be given to them so that you are happy with your short and long term selection from a vast group of quality manufacturers of these simple yet high technology devices.
Here are some things to consider when selecting your next ultrasonic thickness gage. Obviously, budget is always something to be conscious of. Handheld ultrasonic thickness gages, depending on the vendor and where they are made, can range from just a few hundred dollars to more than $4,000. There are also many factors involving the application. It is important to know beforehand what the instrument can and cannot do so that you and the supplier do not have a misconception of the instrument’s capabilities.
It is critical to list the materials and complete thickness range of each material along with desired accuracy, temperature at the time of the readings, surface finish (painted), if the surfaces are parallel, and if a fluid can be applied to the material. The fluid is usually a water soluble ultrasonic couplant required for high frequency sound to enter the part as the ultrasonic frequencies are in the millions of cycles per second and do not travel through air.
Other factors are more related to individual preferences and options such as the need to use echo to echo to ignore coatings and live waveform referred to as A-scan (more details below), an internal datalogger, temperature correction, oxide scale, high penetrations, use of different frequencies, diameters and types of probes such as a pencil probe vs. a dual probe. Other considerations should be given to the environment in which the product is used such as indoor vs. outdoor use for both IP rating for dust and moisture and display type and size for viewability including in direct sunlight.
You should also consider weight, size and battery type. Some units are very small and can fit in your shirt pocket and utilize the convenience of AA type alkaline batteries while others offer more than 24 hour battery life utilizing the latest in lithium Ion rechargeable batteries at the sacrifice of a larger unit. Also, careful consideration should be given to serviceability of the unit, where it is manufactured and the reputation of the vendor’s customer service and track record.
In addition to budget, here is a list of things to consider for these applications:
- Material or materials to be measured. Essentially any engineering material can be measured within a specific range. It is important to list all materials and the thin and thickness range to be measured.
- Thickness range of each material
- Are the front and back surfaces parallel
- Surface condition, smooth, painted rough (RMS finish)
- Temperature at time of reading. Sound velocities can change during a curing process such as a piece of plastic out of a blow molding machine. This would not be a good application.
Also, consider these questions:
- Can a fluid be applied to the material referred to as ultrasonic couplant? As with medical ultrasound when imaging babies, ultrasound does not pass through air and a fluid needs to be applied to the material for ultrasound to enter the part.
- Do you have direct access to the part? A buried pipe is not a good application as you must have direct access to the part by touching it or spraying water on it (immersion technique)
- Desired accuracy, such at .01”, .001”, .0001” (.1, .01, .001mm)
- Is the part painted? See below for more details on this application.
- Do you require datalogging, save and send readings to the computer for permanent documentation? An example would be studying corrosion rates in a pipe or storage tank.
- Do you need to view the live waveform (A-scan), see below regarding why this is important
- Do you want to consider a unit with an upgrade path (field upgradability to unlock software options and no need to return the instrument to the factory)?
In addition, consider the physical size of the unit (fits in shirt pocket vs. handheld); environmental concerns such as IP rating or explosion proof; display size; display color or monochrome; sunlight readability; and reputation of vendor.
Ultrasonic Thickness Gages
Ultrasonic testing and the use of thickness gages using ultrasound is a very well-known technique. The primary reason for using an ultrasonic thickness gage is you can nondestructively test the wall thickness of the material without destroying the part. Commonly the two primary uses are for detection of wall thinning due to corrosion or as a quality control tool for material thickness consistency. The applications range from measuring pipes, tubes, boilers, ship hulls-considered corrosion to plastic bottles, toys, coil steel, aircraft aluminum and coil steel-considered precision, to name a few.
There are many manufacturers of such products around the world. Handheld units can start as low as a few hundred dollars and can go up to several thousand dollars. Obviously, there will be a distinct tradeoff from the price you pay to the feature set that is included. Nowadays, software is very flexible and many manufacturers use the same basic electronics to satisfy budget and application needs but vary the internal software to satisfy more challenging needs. Several companies now offer the convenience to do field upgradability. What this means is a basic instrument of “thickness only” can unlock software to enable features such as echo to echo, datalogger and live waveform. This is a tremendous convenience and saves time and money as there is no downtime or extra shipping costs.
One common example of this is a technique referred to as echo to echo. Here is the basic application and solution. Many times parts such as a storage tank or steel ship hull are painted. When using an ultrasonic thickness gage without the echo to echo feature, the thickness of the paint will introduce an error of roughly 2.5 times the thickness of the paint. The reason for this is the sound speed used to measure the base steel is 2.5 times faster than paint. So a .010” (.25mm) thickness of paint will introduce a .025” or .625mm error. The echo to echo technique offered by many manufacturers measures the time between two successive backwall echoes in the base material thus taking the paint thickness out of the equation.
Some consideration should be given to the thickness of the base material as most vendors will state the base material should be at least .100” or 2.5mm in echo to echo mode. Also consider a more heavily damped transducer and ideally viewing the live waveform to verify the echoes are legitimate is recommended. Using a “thickness only” gage with just numbers and not a live waveform, particularly on thin materials can miss a doubling effect. This could show a reading of .120” when in fact the part is one half that or .060”. By viewing the live waveform, a trained operator could see this error.
I like to compare this to fishing. On a boat you can have a depth finder. This would be equivalent to a gage with a “thickness only” display while a “fish finder” would be equal to a thickness gage with a live waveform. While a boater could determine if the changing depth of the water was just the water, it could be a rock, a whale or bait, the same is true of the thickness meter with the live waveform where an operator can look for things such as doubling, mode converted echo errors or even flaws and delamination if large enough. Some vendors call this top coat or through coat. In these cases, some companies have patents on their respective techniques.
Modern ultrasonic thickness gages have internal dataloggers, some with up to 32 GB of micro SD card memory. Other unique features include blue tooth and direct interface to Microsoft Excel. Readings can be given file names, user names, locations, prefix, notes and set up in files such as linear, 2D, 3D, boiler and with custom points. This allows for a great deal of flexibility when collecting and comparing readings over inspection outages.

